
Contents
- Our mission
- Getting started
- The bookshelf
- Writing and editing
- Chapters, parts and matter
- Pictures
- Sticky notes
- Book details and copyright page
- Publisher Control Number
- Importing a manuscript
- Replacing a manuscript
- Diaries and journals
- Book tools
- Exporting
- Print PDF
- E-books (EPUB)
- Publishing checklist
- AI tools (optional)
- Settings
- Trial, Basic and full version
- Updates
- Cloud sync (optional)
- Offline mode
- Your files and backups
- Privacy and the GDPR
- Keyboard shortcuts
- Glossary
- Troubleshooting and help
Our mission: your book, your control
Emberforge exists to keep authors in control of their own work. Your manuscript is yours: it lives on your computer, in ordinary files you can open, copy and back up, and you decide where it goes and when.
No cloud or AI required
- You can write, edit, import and publish a whole book without ever using a cloud service or an AI service. There is no account to create and nothing to sign in to.
- Emberforge works offline. By itself it goes online only to check for updates, which you can switch off, and, once you have entered an activation key for the full version, for a brief license check once a day. Basic mode and the trial never make a license check.
- AI tools are optional extras. If you choose to use them, you bring your own key, your text goes straight to the service you pick, and you can hide every AI tool if you never want to see them.
- Cloud sync is optional too. If you write on more than one computer, the full version can keep your books in step through your own Google Drive, encrypted on your computer first so that neither Google nor we can read them.
Publish-ready, without paying for formatting or conversion
- Formatting a print interior and converting a manuscript into an e-book are often paid for as separate services, or done with complex design software. Emberforge does both, on your own computer.
- The full version creates print-ready PDF interiors for print-on-demand services and printers (trim size, mirrored margins and gutter, embedded fonts, title pages, contents, page numbers, running heads and an index) and EPUB e-books for Kindle, Apple Books, Kobo, Google Play and other stores.
- Every setting is yours to choose, and when you revise, you simply export again, as often as you like, at no extra cost.
Emberforge prepares your book’s interior and e-book. The cover is made separately, for example by your designer or with the store’s own cover tools.
Getting started
Emberforge is a writing and publishing app for Windows 10 and 11. You write your book chapter by chapter, and Emberforge keeps the structure, numbering, front and back matter, copyright page and pictures in order, then produces a print-ready PDF, an EPUB e-book, or a Word, OpenDocument, Markdown or plain-text file.
Installing
- Download Emberforge and run the installer.
- If Windows shows “Windows protected your PC”, choose More info, then Run anyway. This appears for new apps that Windows does not know yet.
- If an earlier copy left its settings file behind, the installer asks whether to keep it or start fresh. Starting fresh keeps a dated backup of the old file.
- Open Emberforge from the Start menu. Your first start begins a 15-day free trial with every feature (see Trial, Basic and full version).
System requirements
- Windows 10 or Windows 11 (64-bit).
- About 450 MB of free disk space for the app, plus space for your books.
- An internet connection only to download Emberforge and its updates, for the full version’s license check, and for the optional AI tools. Writing, importing and exporting work offline.
Your first book
- On the bookshelf, choose New book and enter a title and author, or choose Import manuscript to bring in an existing Word, OpenDocument, Markdown or text file.
- The book opens on its first chapter. Start typing: Emberforge saves automatically.
- Add chapters with + Chapter on the tabs at the right edge of the page.
- When you are ready, choose Export to create a PDF, an e-book or a document.
Every book is an ordinary folder of text files in Documents\Book_Editor, so your writing is never locked inside the app. See Your files and backups.
The bookshelf
The bookshelf is Emberforge’s home screen. The book you worked on last is shown large, with its word and chapter counts, the words written today and any open notes, and a Continue writing button that takes you back to the chapter you were in. Your other books appear below as cards.
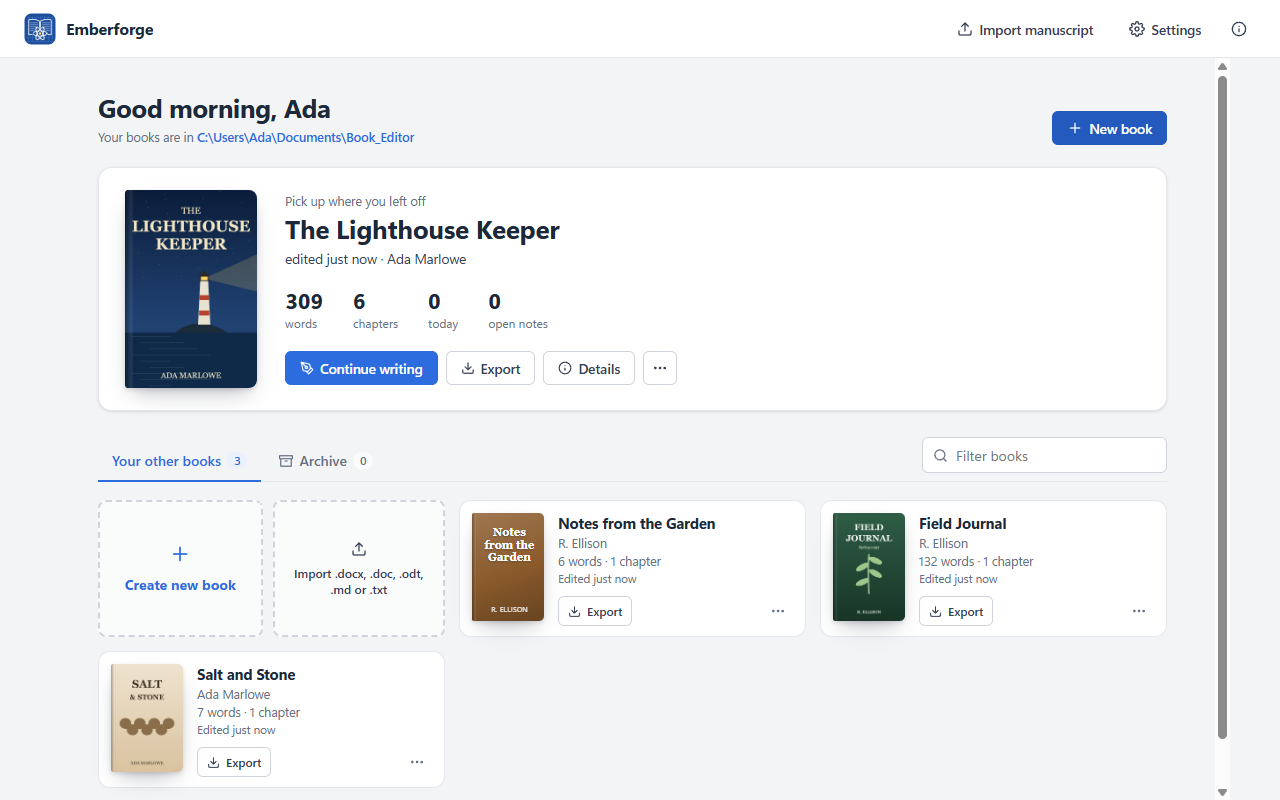
- Book menu (⋯): Open, Book details, Export, Import and replace manuscript, Rename, Clone, Show in folder, cover options, Archive and Delete.
- Pin: the pin on a cover keeps that book at the top of the grid. Pinning does not count as an edit.
- Covers: drop a JPEG or PNG onto a book, or add one in Book details. Remove it from the book menu.
- Archive: archived books move to the Archive tab. They can be viewed there but not edited; choose Restore to bookshelf to work on them again.
- Delete moves the book folder to the Windows Recycle Bin, so it can be recovered.
- Filter the shelf by typing part of a title.
- The Emberforge logo at the top left opens Settings → About.
Writing and editing
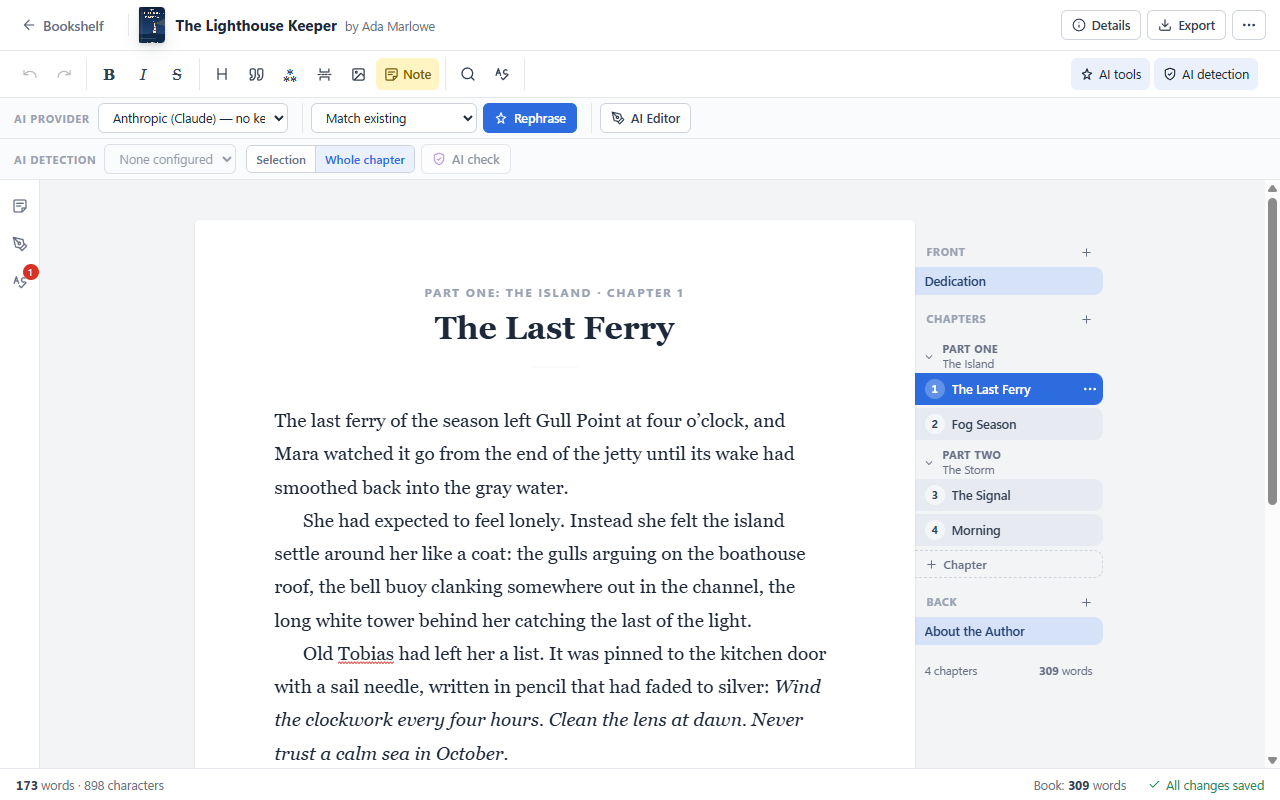
The editing page has the book’s title bar across the top (cover, title, Details, Export and the ⋯ menu), a formatting toolbar, the page itself, notebook tabs for the chapters on the right, and a collapsible panel on the left for notes and AI Editor reviews.
Formatting
- Bold, italic and strikethrough.
- Subheadings inside a chapter.
- Block quotes for letters, epigraphs and quoted passages.
- Scene breaks (shown as an ornament, printed as
* * *or your chosen style). - Page breaks (Ctrl+Enter): the next text starts on a new page in the PDF, Word and OpenDocument exports.
- Blank lines you type on purpose are kept.
- Smart punctuation turns straight quotes and dashes into typographic ones as you type.
- Spell checking uses US English.
Find and replace
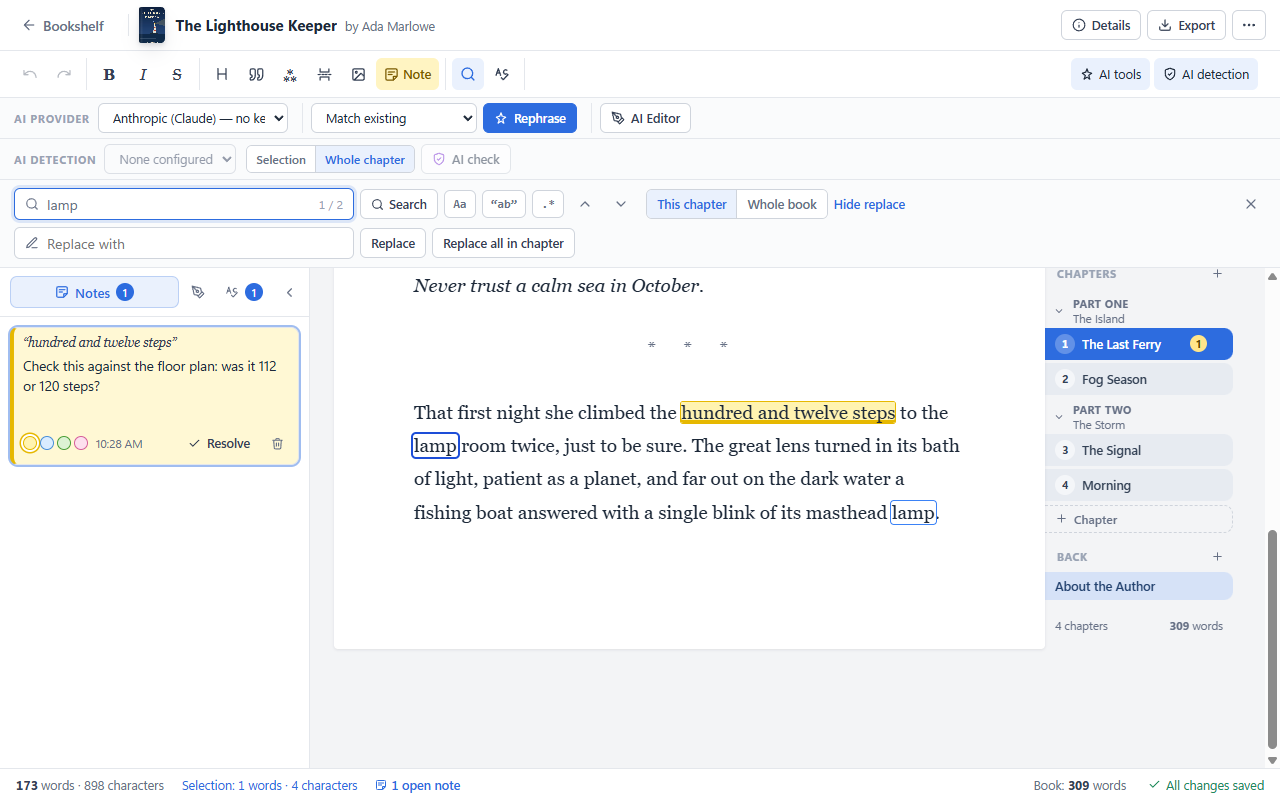
Ctrl+F finds and Ctrl+H replaces, in the current chapter or the whole book, with options for match case, whole word and regular expressions. Type what you are looking for, then click Search or press Enter. The search starts from what is on the screen (the cursor or selection when it is in view, otherwise the top of the page) and scrolls the page to the match. Enter or the down arrow goes to the next match, Shift+Enter or the up arrow to the previous one. With Whole book, a list shows every chapter with matches, and going past the last match in a chapter opens the next chapter that has one. Matches are outlined, so AI detection highlights and spelling underlines stay visible.
Replace all in the whole book leaves alone any chapter with formatting Emberforge can’t keep (see Editing chapter files outside Emberforge) and tells you which ones it skipped. To replace there too, open the chapter and use Replace all in that chapter; a copy of the chapter as it was is kept first.
Spell check
Emberforge checks your spelling as you write, entirely on your computer: nothing is sent anywhere. A misspelled word gets a red wavy underline a moment after you finish it (never while you are still typing it). Right-click it for suggestions, or to Ignore it in that place, Ignore all of it in the book, or Add to dictionary.
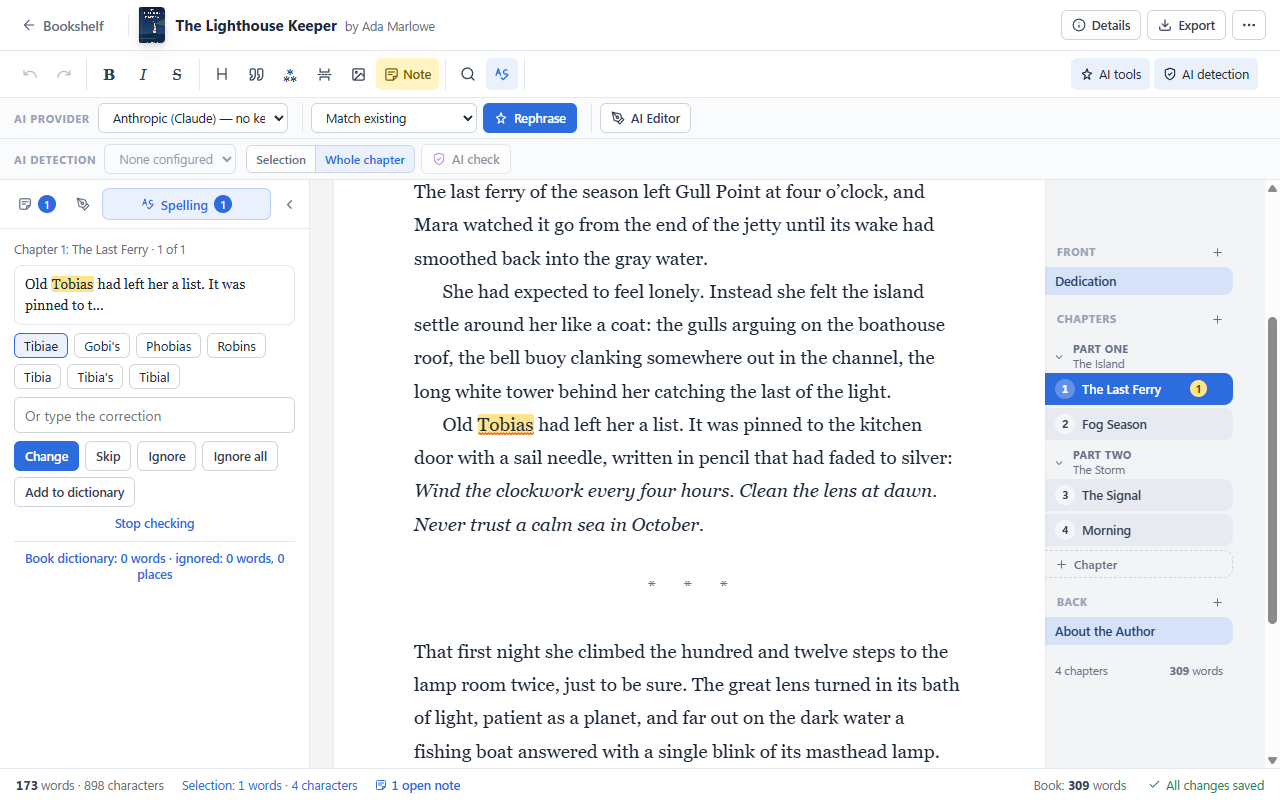
To check a whole chapter or the whole book, click the spelling button in the toolbar or press F7. The Spelling panel shows each word in its sentence with suggestions, and these choices:
- Change replaces the word with the chosen suggestion, or with what you type.
- Skip leaves it this time.
- Ignore never flags the word in that place again.
- Ignore all never flags the word anywhere in the book.
- Add to dictionary adds it to the book’s own dictionary, for names and invented words; Emberforge then also suggests it when you mistype it.
Each book has its own dictionary and list of ignored words (see them at the bottom of the Spelling panel, where you can also remove words). They are saved with the book and, with cloud sync, shared between your computers. Spell check covers US, UK, Canadian and Australian English, following the book’s language in Book details, and is part of every edition, including Basic mode. Underlining as you write can be switched off in Settings → General; the Spelling panel still works. Words in capitals, words with digits, and web and e-mail addresses are not checked.
Saving
Emberforge saves a few seconds after you stop typing, when you switch chapters, when you go back to the bookshelf and when you close the window. Ctrl+S saves immediately. You can change the autosave delay in Settings → General.
Counts
The status bar shows the chapter’s words and characters, the selection’s counts when text is selected, and the whole book’s word count.
Editing chapter files outside Emberforge
Chapters are Markdown text files, so other programs, or an AI agent such as Claude Code working in your library folder, can edit them. Emberforge watches the library: when a chapter changes on disk, the open editor reloads it, and the text it replaced is kept in the book’s .versions folder. Emberforge never saves over such a change: if you also have unsaved changes, it asks which version to keep and puts the other one in .versions. New .md files dropped into a book’s chapters folder are added to the end of that book (when Emberforge is closed, the next time you open the book). Other files an agent leaves in a book folder, such as notes or a CLAUDE.md, are left alone.
Formatting Emberforge can’t keep. Another program or an AI assistant may add things to a chapter that Emberforge’s editor doesn’t have, such as links, tables, footnotes or small headings. When you open such a chapter, a notice above the page lists them and what will happen to each one when the chapter is saved (a link keeps its words but loses its web address, for example). Just opening or reading the chapter, or pressing Ctrl+S, changes nothing. Once you edit it, the first save keeps a copy of the chapter as it was in the book’s .versions folder, then saves your text and tells you the copy’s name. (Show in folder on the notice shows the chapter file itself, in the book’s chapters folder.) You can also ask your AI assistant to rewrite those parts as plain text; the chapter reloads and the notice goes away by itself. Got it hides the notice until more such formatting arrives.
Older text formats. Some programs, such as Notepad or Windows PowerShell, can save text in an older format instead of the standard one (UTF-8). Emberforge reads these chapters too, even when only part of a chapter is in the older format. When you open the book, it converts the chapters whose format it can be sure of to UTF-8 and tells you which ones it converted. Any other chapter in an older format, for example one that mixes the older and the standard format, or one another program saves while the book is open, is shown as well as Emberforge can read it and converted the next time the chapter is saved, after you edit it. A notice names such chapters (the first time you open the book after starting Emberforge) so you can check their letters and symbols before you edit them. Either way, the original file is kept first in the book’s .versions folder: if any letters or symbols look wrong, the original is there. Older formats for Japanese, Chinese and Korean text can’t be read, so save such chapters as UTF-8.
Working with an AI agent. Your library folder contains AGENTS.md, written by Emberforge: the rules an AI agent needs to edit your books safely (which files to change, the Markdown Emberforge keeps, how to read and save chapter files in the standard text format, how to add or reorder chapters in book.json, and what never to do). Claude Code reads it through the CLAUDE.md next to it; for other agents, start them in the library folder or tell them to read AGENTS.md first. Notes about one book for the agent can go in a CLAUDE.md or README.md in that book’s folder; they stay on that computer. Before an agent changes a chapter, save it (Ctrl+S) or switch to another one. If you edit AGENTS.md, Emberforge stops updating it.
Chapters, parts and front and back matter
The tabs on the right edge of the page are the book’s table of contents. Front and back matter tabs are tinted; chapters are numbered automatically; parts are dividers that can be collapsed. The open chapter’s tab stands out into the page.
- + Chapter adds a chapter. Right-click a tab (or use its ⋯) to add a chapter before or after it, rename it, move it, or remove it.
- Front matter (dedication, epigraph, foreword, preface…) and back matter (afterword, acknowledgments, about the author…) are unnumbered. A front or back matter page can be left untitled: it prints without a heading and is left out of the contents.
- Parts group chapters. Each part either continues the book-wide chapter numbers or numbers its own chapters from 1.
- Numbering style: in Book details → Book, choose “Chapter 1” or “Chapter One”, and “Part One” or “Part 1”.
- Dedication and epigraph: a front matter page titled “Dedication” or “Epigraph” is set in the PDF as a centered page of its own, without a heading, before the contents.
- Reordering never renames your files: numbers and titles come from the book’s settings, not the file names.
Pictures
Add a picture with the toolbar’s picture button, or paste or drop an image into the text. PNG and JPEG files are stored as they are; other formats are converted to PNG. Pictures are kept in the book’s images folder.
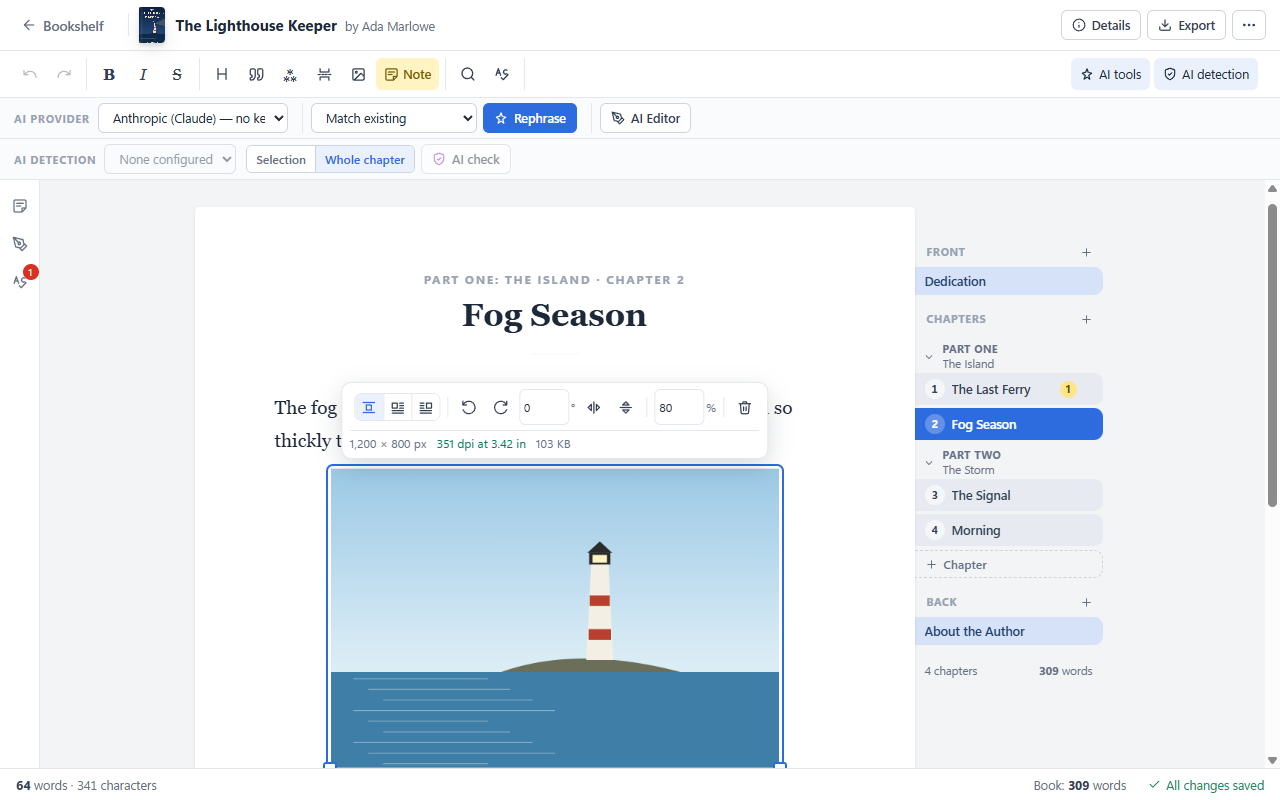
- Text wrapping: centered, picture on the left, or picture on the right.
- Size: drag a corner, or type a width as a percentage of the text width.
- Rotate in 90° steps or by any angle, and flip horizontally or vertically.
- Caption: type it under the picture. Long captions wrap; Enter finishes the caption.
- While a picture is selected, Emberforge shows its size in pixels, its resolution (dpi) at the printed size and its file size.
The caption style (font, size, italic, bold or small capitals, and alignment) is set per book in Book details → Picture captions. Pictures, wrapping, rotation, flips and captions carry through to the PDF, EPUB, Word and OpenDocument exports.
Sticky notes
Select some text and choose Note (Ctrl+Alt+M) to attach a note to it. Notes have colors, can be resolved and reopened, and can be deleted. They follow their passage as you edit and are stored beside the book, never in the chapter text.
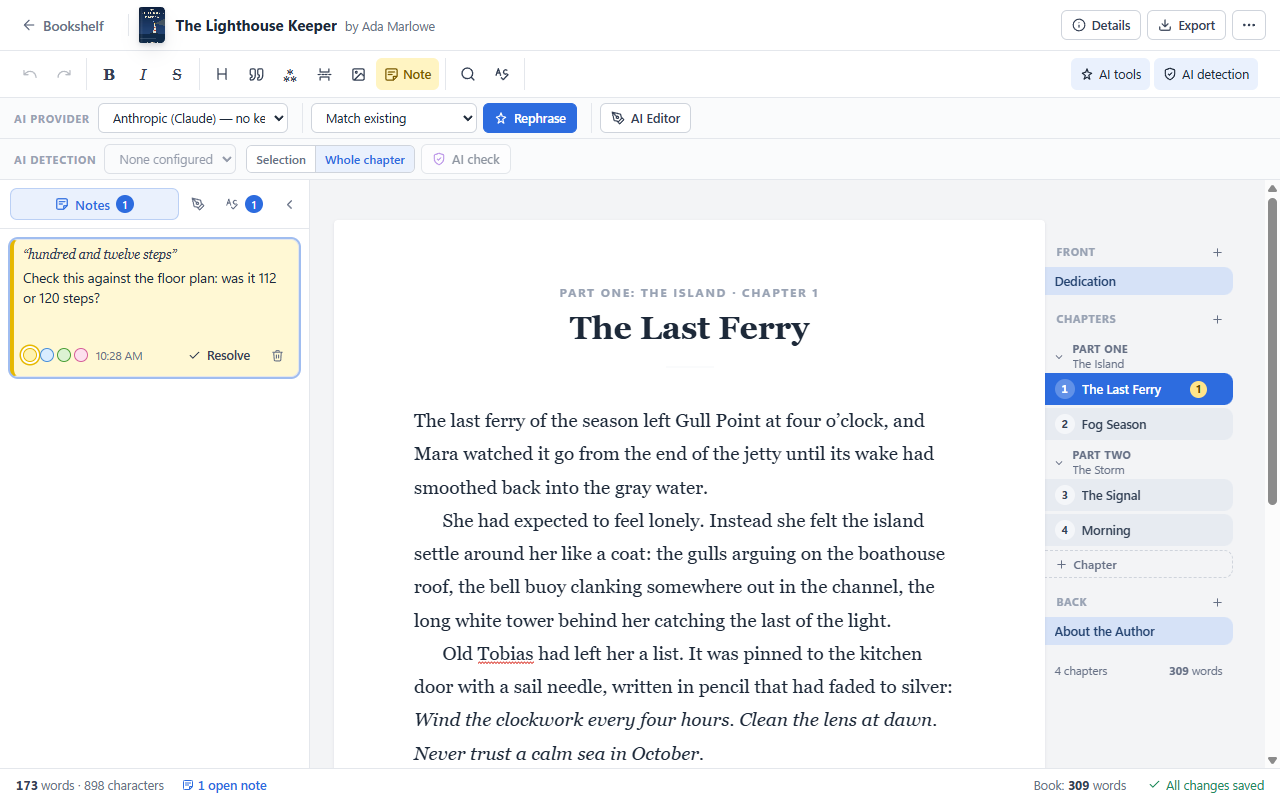
Notes appear in the Notes tab of the left panel, which opens by itself in a chapter with open notes.
In exports: notes are never in a final PDF. They can be included in a draft PDF (as PDF comments), in Word and OpenDocument files (as comments) and in Markdown and text files (after their paragraph). The option always starts unticked.
Book details and the copyright page
Open Details from the book’s title bar or the bookshelf. It has three tabs.
Book
Title, subtitle, author name, publisher, how chapters and parts are numbered, the cover image, and the book’s language. The language sets the spelling for spell check (US, UK, Canadian or Australian English) and goes into EPUB e-books, where e-readers use it for hyphenation and read-aloud. In the full version and the trial, also the series name and the book’s number in it (for example Quantum Embers, 2), which stores use to group the books of a series.
Copyright page
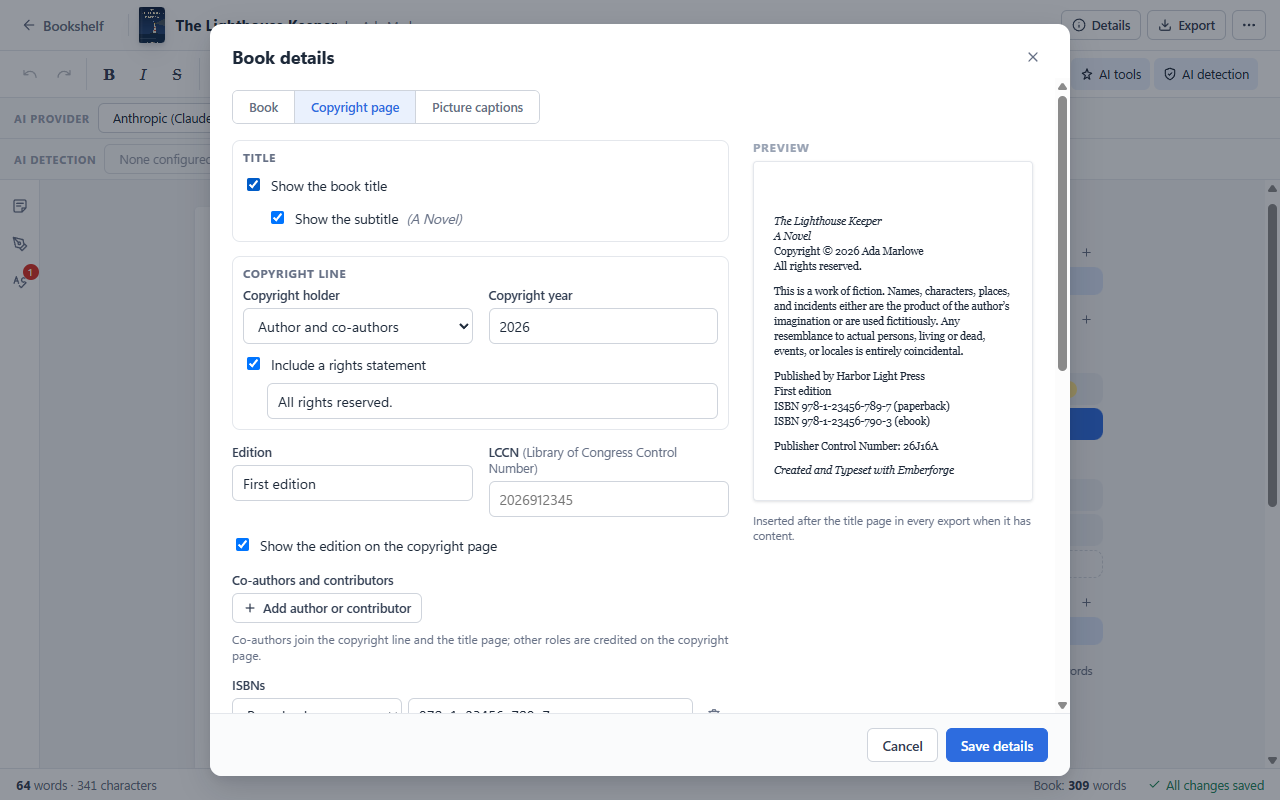
- Co-authors and contributors: editors, illustrators, cover designers, translators, narrators or any other role.
- Edition, copyright year, LCCN, and any number of ISBNs, each with its type (hardcover, paperback, eBook, EPUB, Kindle, audiobook, large print and more). Emberforge warns when an ISBN’s check digit doesn’t match, or when an LCCN has the wrong number of digits (10 since 2001: the year and a 6-digit number).
- The copyright holder: the author and co-authors, the author only, the publisher, or someone else.
- Whether to show the title, subtitle and edition on the page.
- A rights statement (on by default: “All rights reserved.”, editable).
- An optional “work of fiction” statement, with standard wording you can edit, and free-form extra text.
- The line “Created and Typeset with Emberforge”, with www.xn3tech.com/emberforge below it (on by default).
- The Publisher Control Number settings.
The copyright page is added to exports whenever an author, publisher, ISBN, LCCN or edition is set. Co-authors join the copyright line and the title page, and other contributors are credited by role.
The PDF and EPUB export settings have a Copyright page section with the same settings, so you can check the page just before exporting. Changes made there are saved to Book details when you export, and apply to every format.
Picture captions
The font, size, style and alignment used for all picture captions in the book.
Changes made while the window is open
If an AI assistant, or cloud sync from your other computer, changes the book’s details while the Book details window is open, the window shows the new details right away, with a short notice naming them; anything you are typing stays as you typed it. Save details saves only the details you changed, so it never undoes a change made elsewhere. If you and the other side changed the same detail, a message at the top shows both versions and asks which to keep: Use the other version or Keep my version.
Publisher Control Number
A Publisher Control Number (PCN) is your own identifier for each version of a book that leaves Emberforge. It is printed in small type at the bottom of the copyright page and added to the export’s file name (Title-26J06A.pdf). Unlike an ISBN, it is for you: it tells you exactly which draft, proof or file you are looking at.
Tracking drafts and revisions
When a book is moving fast, many versions are in circulation at once: a PDF proof with your editor, a Word file with beta readers, an EPUB on your own Kindle, a printed proof copy on your desk. A few rounds later it is hard to tell which version someone read, which comments still apply, and whether the file you are about to upload is the latest one. The Publisher Control Number answers those questions:
- Every copy carries its version. The number is on the copyright page as well as in the file name, so a printout, a renamed file or a forwarded email attachment still says which version it is.
- Feedback points to an exact version. When your editor writes “notes on 26J06B”, you know which text they read, and whether you have changed it since.
- Newer is easy to spot. Date-based numbers sort in order (26J06A, 26J06B, 26J09A…), so the latest version is obvious at a glance and in a folder listing.
- One number means one text. With Keep the same number while nothing has changed, exporting the same text again, as a PDF and an EPUB or at another trim size, reuses the number. Any edit to a chapter or to the book details gives the next export a new number. Changing only export settings does not.
- Every export is recorded. Emberforge keeps a record of each export (number, format, file name and date) in the book’s
book.json, so you can look up which file went out with which number.
Tip: ask editors and readers to quote the number from the copyright page with their feedback, and keep a short note of what changed in each version. For the final edition you can keep the number as a printing or edition code, or switch it off.
Customizing the number (full version)
Publisher Control Numbers are part of the full version and the trial. Set them up per book in Book details → Copyright page → Publisher Control Number:
| Format | Example | Your settings |
|---|---|---|
| Date-based (default) | 26J06A | Year, month letter, day and a serial letter (after Z it continues Z.1, Z.2…). Best for fast drafts: the number tells you when the version was made. |
| Self-incrementing | XN3-0007 | Your own prefix, the next number and the minimum digits. Good for a house style or for numbering proofs 1, 2, 3… |
| Fixed | XN3-STORM-01 | Any text you choose, the same on every export. Useful for a print run or edition code. |
- On or off for each book. When it is off, nothing is printed and files are named just
Title.pdf. - Last issued shows the most recent number and can be changed, for example to continue a sequence you started elsewhere.
- Next export previews the number the next export will get.
- Keep the same number while nothing has changed reuses the last number for unchanged text.
- The PDF Preview never uses up a number, so you can check the layout as often as you like.
- A cloned book starts its own numbering.
Importing a manuscript
Choose Import manuscript on the bookshelf and pick a .docx, .doc (Word 97–2003), .odt, .md or .txt file. No other software is needed, and nothing is sent over the internet.
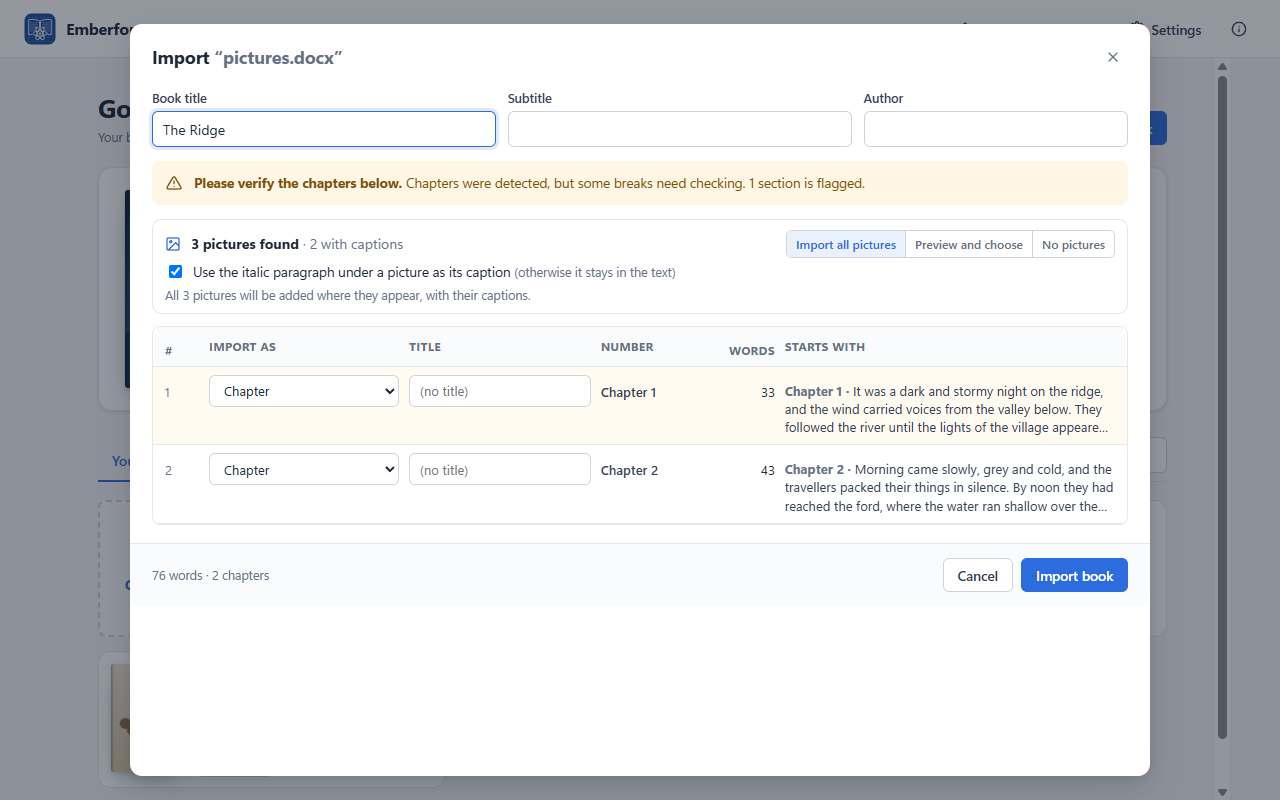
Emberforge splits the manuscript into chapters using “Chapter N” and “Part N” headings, Word heading styles, words such as Prologue and Epilogue, stand-alone numbers and page breaks. It skips tables of contents and title pages it recognizes, and flags anything doubtful. Before importing, you can set each section to be a chapter, part, front matter, back matter, merged with the one before, or skipped, and change its title and numbering.
- Italics, bold, strikethrough, centering, page breaks and scene breaks come through.
- Pictures in Word files: import all of them, preview and choose, or import none. A caption in Word’s Caption style becomes the picture’s caption. An italic line right under a picture can also become its caption (a checkbox lets you keep it in the text instead).
- If pictures sit in a section set to Skip, such as opening pages before the first chapter, the review says so and offers to import that section as front matter.
- If a book with the same title already exists, you can overwrite it, archive it, or rename one of them.
- If the manuscript is a diary or journal, the review offers to make its dates subheadings (see Diaries and journals).
Replacing a manuscript
When a new version of a book’s manuscript comes back from an editor or another program, choose Import and replace manuscript… in the book’s menu (⋯) on the bookshelf and pick the file. Nothing changes until the last step.
- Compare. The current and new manuscripts side by side: title, author, words, chapters, when the book was last changed and when the file was saved. If they look very different (many more or fewer words or chapters, another title or author), a warning asks you to check that this is the right file.
- Check the chapters, exactly as when importing a book: sections, pictures and diary dates.
- Keep the current manuscript if you like. Archive a copy of the book puts the whole book as it is now in the Archive, named “Title (before import date)”. Back up the manuscript as a Word file opens the export options for a DOCX file.
- Check the book details: the Book and Copyright page tabs, with the book’s current values. Details found in the new manuscript, such as a new ISBN, are offered where they differ. Then choose Replace manuscript, or go back or cancel.
The book keeps its cover, Book details, export settings, spelling words and place on the bookshelf. Sticky notes, AI detection highlights, AI Editor findings, pictures and earlier versions of chapters belong to the old text, so they are cleared, and the old chapter files go to the Recycle Bin.
Diaries and journals
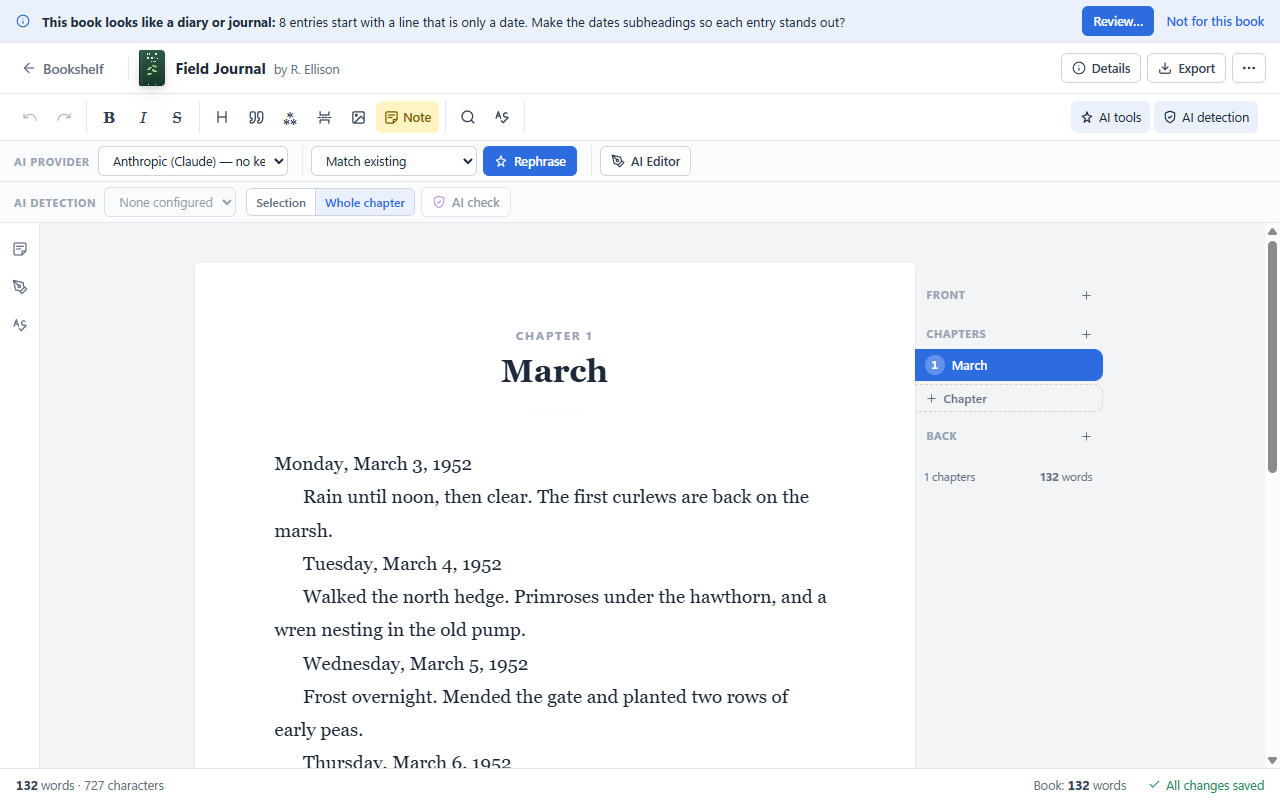
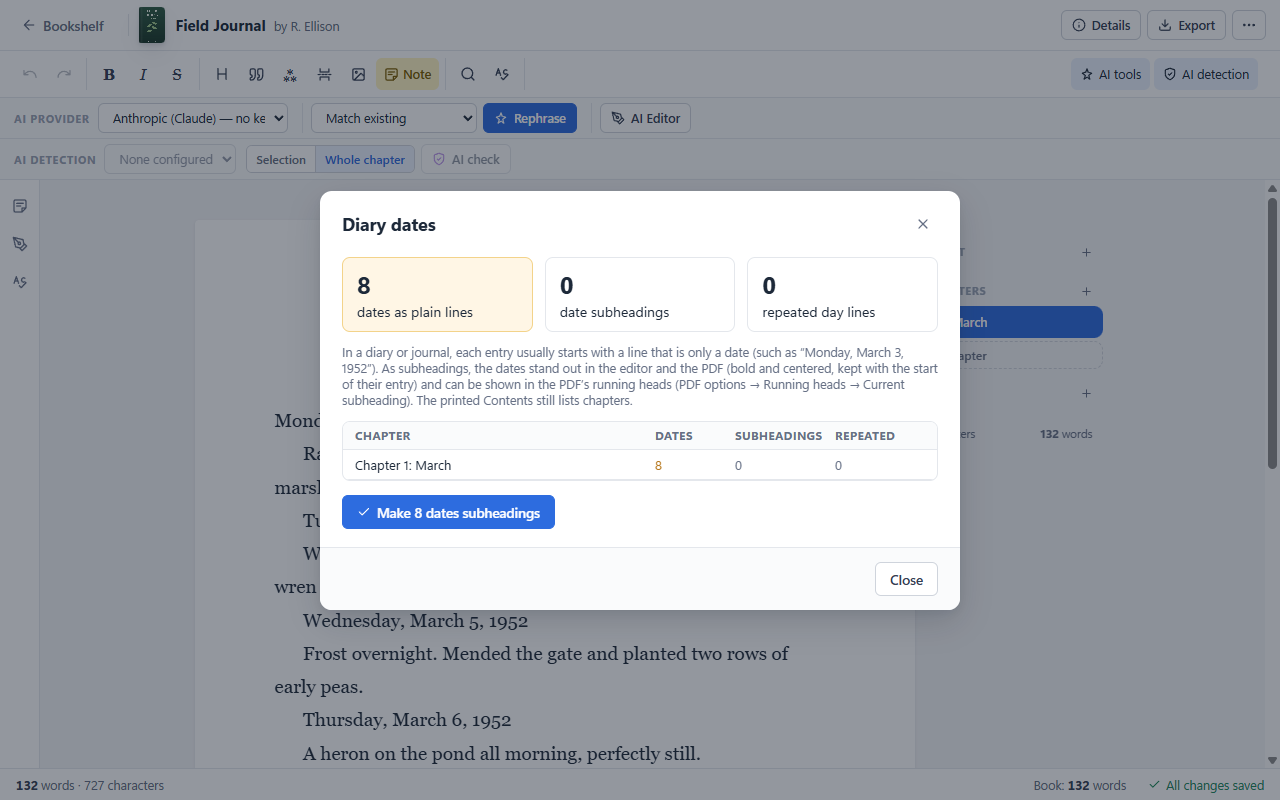
In a diary, journal or log, each entry usually starts with a line that is only a date. Emberforge recognizes these lines in common forms, such as “Tuesday, January 1, 1974”, “Jan. 3”, “3 May 1974”, “1/3/74” or “1974-01-03”, and can turn them into subheadings so every entry is an obvious section: bold and centered in the PDF, and never left alone at the bottom of a page.
- When you import or open a book with five or more such date lines, Emberforge suggests it. Choose Review… to see the counts per chapter, or Not for this book to stop the suggestion.
- You can also run it at any time from the book’s ⋯ menu: Diary dates → subheadings….
- Optionally, the day line that repeats a date right under it (for example “Tuesday.” under “Tuesday, January 1, 1974”) is removed. You can see every line before anything changes.
- Before changing a chapter, Emberforge copies it into a
.backupsfolder inside the book folder.
Tip for printed diaries: in the PDF settings, set the running heads to Current subheading. Each page then shows the date of the entry at its top, like a dictionary, while the printed contents list only the months or chapters. For e-books, tick List subheadings under their chapters in the contents to make every date navigable.
Book tools
The book’s ⋯ menu on the editing page has:
- Find & fix scene breaks… counts standard scene breaks (
* * *) and escaped ones (\* \* \*, often left by other programs) in every chapter, and converts them in either direction. - Diary dates → subheadings… (see Diaries and journals).
- Show book folder opens the book’s folder in File Explorer.
- Reload from disk re-reads the book after you changed its files elsewhere.
Exporting
Choose Export in the book’s title bar or on its bookshelf card, pick a format and choose where to save the file.
| Format | Use it for |
|---|---|
| Print PDF | A print-ready interior for print-on-demand services and printers: trim size, mirrored margins, embedded fonts, page numbers, running heads, optional contents, index and draft marks. |
| E-book (EPUB) | Kindle (upload to KDP), Apple Books, Kobo, Google Play and other stores. Full version and trial. |
| Word (DOCX) | A formatted manuscript for editors, agents and other tools: title page, copyright page, page breaks, chapter headings and pictures. |
| OpenDocument (ODT) | The same manuscript for LibreOffice, Google Docs and other office suites. |
| Markdown (MD) | Plain text with formatting marks; pictures are copied into a folder beside the file. |
| Plain text (TXT) | Unformatted text; pictures are listed by their captions. |
For Word, OpenDocument, Markdown and text you can choose whether to include the title page, open notes, and how scene breaks are written. If a picture is missing from the book’s images folder, the export says which one and leaves it out.
Page size for Word and OpenDocument
In the full version, choose the page size for Word and OpenDocument files: US Letter, A4, US Legal, Executive, B5, A5, or a book size (6 × 9, 5.5 × 8.5 or 5 × 8 in). Margins and pictures fit the page, and Emberforge remembers your choice. Basic mode uses US Letter.
Print PDF
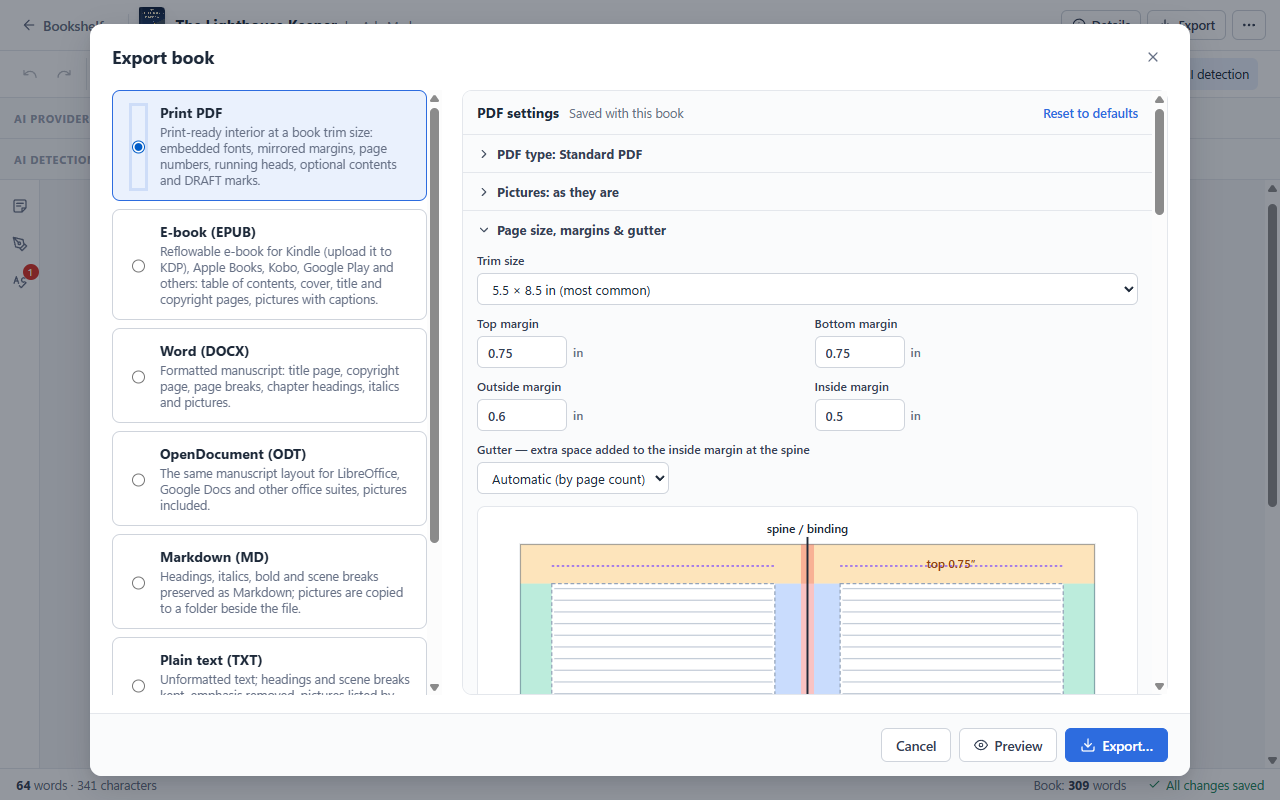
The PDF settings are saved with each book. Use Preview to build the PDF and see its page count and inside margin without using up a Publisher Control Number. The preview shows the book as it will be printed: pages side by side in two-page spreads, with page 1 alone on the right, as in an open book (or one page at a time). It is for looking only: export the PDF to get a file you can print or send.
How a printed page is laid out
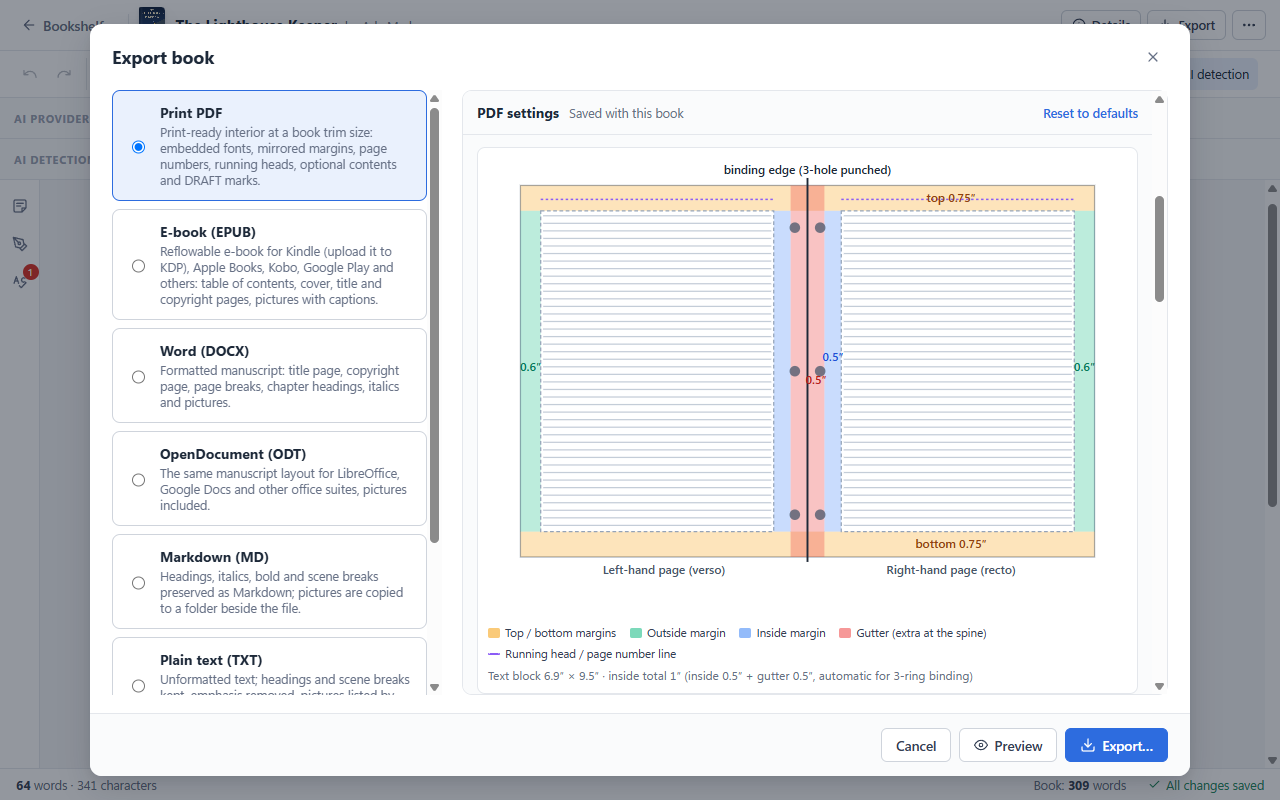
- Trim edge: the size of the finished page (the trim size).
- Margins are mirrored: the inside margin is next to the spine on both pages, and the outside margin is at the outer edge.
- The gutter is extra space at the spine, so text doesn’t disappear into the binding.
- The text block is what is left for your text.
- Running heads and page numbers sit in the top and bottom margins.
PDF type: print-ready, archival or standard
The full version and the trial can make four kinds of PDF (PDF type in the PDF settings):
- Standard PDF: for proofs, beta readers and reading on screen. Pictures keep their colors, and draft marking and notes are available.
- PDF/X-1a:2001 (recommended for print): the standard print-ready format that IngramSpark asks for and KDP accepts. Text is printed in pure black ink, pictures in black and white, there is no transparency, and the trim size and the printing conditions (North America or Europe) are recorded in the file.
- PDF/X-3:2002: print-ready with color pictures, which keep a color profile so the printer can convert them. IngramSpark lists it, but PDF/X-1a is the safer choice.
- PDF/A-2b: for long-term archiving, for example for a library or your own records. Not meant for printers.
Print-ready and archival PDFs leave out draft marking, notes and (for print) the cover page. Emberforge builds them to the standards, but always check the file with your printer’s upload check, or with Acrobat’s Preflight, and order a proof before you publish.
Pictures in black and white for print
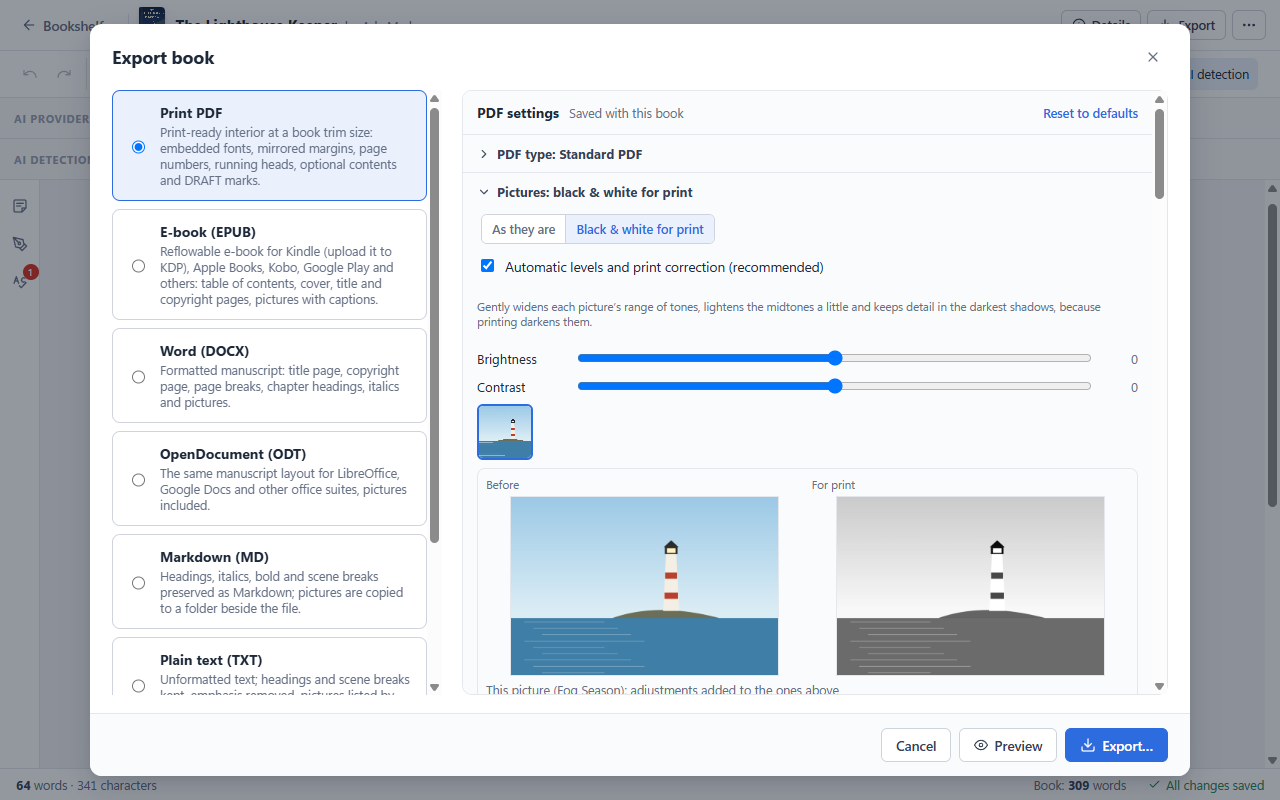
For a book printed in black and white, set Pictures to Black & white for print (PDF/X-1a always does). Emberforge converts each picture to grayscale and, with Automatic levels and print correction on, gently widens its range of tones (without turning large dark or light areas black or white), lightens the midtones a little and keeps detail in the darkest shadows, because printing darkens them; pictures that look fine on screen often print too dark. Brightness and Contrast adjust every picture; select a picture to see it before and after and to give it its own adjustments, which are added to the book’s. Pictures much sharper than needed are reduced to 300 pixels per inch at their printed size. Your picture files are never changed.
Page size, margins and gutter
- Trim sizes: 5 × 8, 5.06 × 7.81, 5.25 × 8, 5.5 × 8.5 (the most common), 6 × 9, mass-market, pocket, B-format, A5, Royal, 8.5 × 11 in (US Letter), or a custom size.
- On automatic, the gutter grows with the page count, because thicker books curve more into the binding, and always meets the usual print-on-demand minimum. You can also enter it by hand.
- A live two-page diagram shows which setting controls which area, and the resulting text block.
8.5 × 11 in: binding
For US Letter pages, choose the binding: perfect bound (glued spine), spiral, coil or wire-o, or a 3-ring binder.
For spiral and 3-ring binding, the automatic gutter keeps text at least 0.75 in and 1 in from the edge; the diagram draws the holes, and a manual gutter that is too small is flagged. One click sets margins suited to the larger page.
Typography
- Bundled fonts (EB Garamond, Crimson Pro, Libre Baskerville and Literata), installed Windows fonts, or fonts you add in Settings → Fonts. All fonts are embedded in the PDF. A separate display font can be used for titles and headings.
- Font size, line spacing, justification, hyphenation and paragraph indent.
- Chapter openings: start each chapter on the next page or on a right-hand page, and choose how far down the page it starts.
- Chapter headings as “Chapter One” or in spaced capitals (“CHAPTER ONE”), and the first words of each chapter in small capitals or plain.
- Scene breaks printed as
* * *, ⁂,• • •or a blank line. - Text is set in pure black ink, with widow and orphan control.
Title pages and contents
An optional half-title, a title page (layout, title size, letter spacing, capitals, series line, author line, ornament and publisher line, with live previews) and a table of contents with real page numbers and dot leaders. Front and back matter can be included in the contents.
Copyright page
The same settings as Book details → Copyright page, with a preview. Changes made here are saved to the book when you export or preview.
Page numbers and running heads
- Page numbers: placement, where numbering starts, roman numerals for front matter (and which pages count), and whether numbers show on chapter openings and blank pages.
- Running heads in the header or footer, separately for left and right pages: the book title, author, chapter title, part title, current subheading (such as a diary date) or your own text, in small capitals, italic or regular type.
Draft marking
A DRAFT watermark (diagonal, or in the top or bottom margin) and “DRAFT” on the title and copyright pages, for review copies. Draft PDFs can also include open notes as PDF comments. Draft marking always starts switched off, so a final PDF is never watermarked by accident.
For review copies you can also add the book’s cover image as the first page (in the Front matter & contents settings).
Index
With an AI provider set up, Emberforge can build a back-of-book index: choose the provider, model and categories (people, places, organizations, subjects, works, events, technical terms) and whether to add cross-references. Page numbers are computed from the real pages on every export. The index is off by default for works of fiction; you can review and remove entries.
After a PDF export, Emberforge asks whether to show the file’s folder; you can remember your answer.
E-books (EPUB)
EPUB is the standard e-book format. Emberforge creates a reflowable EPUB 3 file (with an EPUB 2 table of contents for older readers) that contains your cover, title page, copyright page, an optional contents page, front matter, parts, chapters and back matter, subheadings, pictures with captions, and the reader’s own table of contents. Book details such as the title, author, contributors, publisher, series, language and e-book ISBN are included for the stores.
Options
Emberforge remembers these for each book.
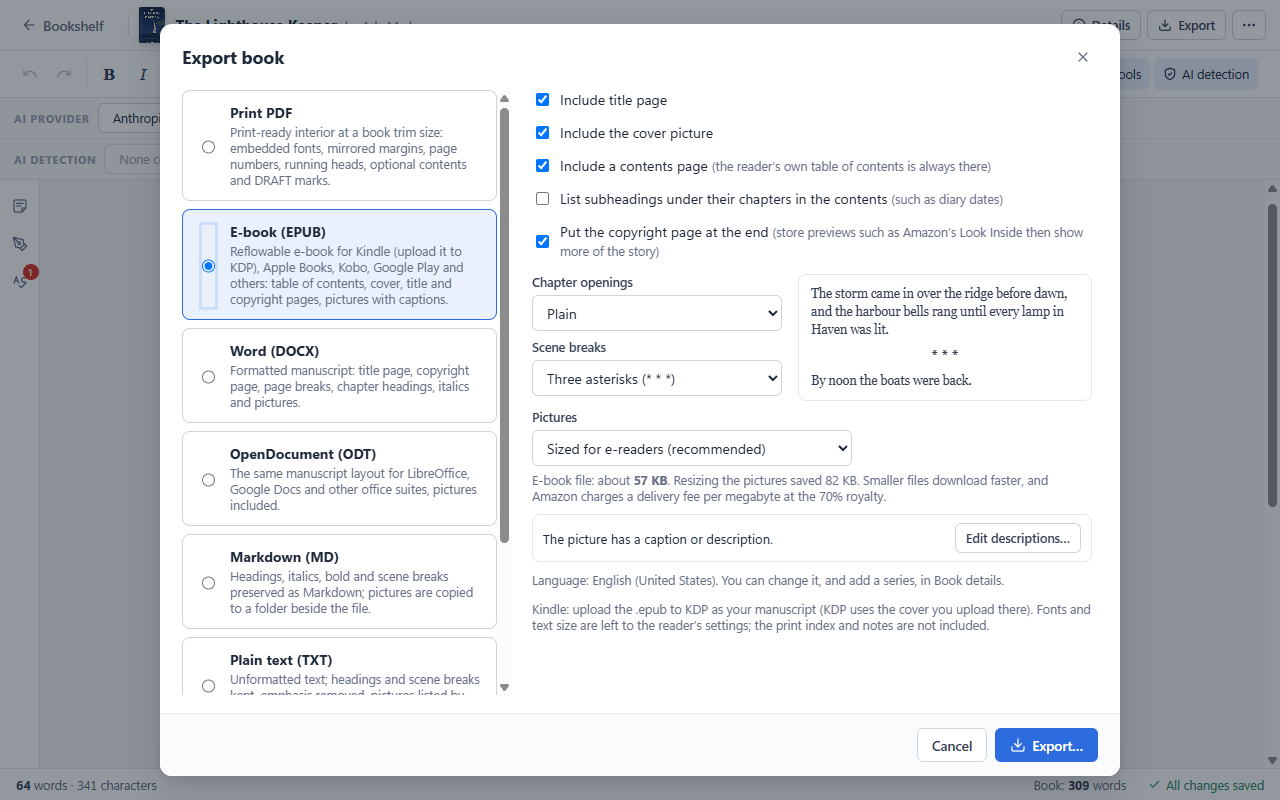
- Include title page, and optionally show the Publisher Control Number on the title page as well as on the copyright page.
- Include the cover picture (when the book has one).
- Include a contents page. Leave it off if you don’t want a printed-style contents page; the reader’s built-in table of contents is always there, because e-readers need it to navigate.
- List subheadings under their chapters in the contents, for example the dates in a diary.
- Copyright page: the same settings as in Book details, plus one for e-books: ISBNs are shown only when the book has an e-book ISBN (eBook, EPUB or Kindle), because a print ISBN doesn’t identify the e-book. Tick Show ISBNs on the e-book’s copyright page to show them anyway, or to add an e-book ISBN. Other changes are saved to Book details when you export.
- Put the copyright page at the end (on by default). Store previews such as Amazon’s Look Inside show the first pages of an e-book, so moving the copyright page to the back lets readers see more of the story.
- Chapter openings: plain, small capitals on the first few words, a drop cap (a large first letter), or a drop cap with small capitals, as in many printed books. A sample in the dialog shows the result.
- Scene breaks: three asterisks (* * *), an asterism (⁂), a fleuron (❦), a short line, or a blank space. A visible mark is safest: a blank space can be lost when it falls at the top of a screen.
- Pictures: Sized for e-readers (the default) scales large pictures down to 1,600 pixels on their longest side and the cover to 2,560, and saves photos stored as PNG as JPEG when that makes them much smaller. Smallest file goes further, for books with many photos. Full size keeps them as they are. The dialog shows the e-book’s file size. Smaller files download faster, and Amazon charges a delivery fee per megabyte at the 70% royalty rate.
Picture descriptions
Readers who use a screen reader or read-aloud can’t see your pictures, so an e-book gives each picture a short text description. A picture with a caption uses its caption. For pictures without one, the dialog shows how many have no description; Describe pictures… lists them with a box for each, for example “A hand-drawn map of the harbour at Haven”. A picture that only decorates the page can be marked Decorative only. A picture with neither a caption nor a description is described as “image”, so every picture has a text alternative. If pictures are still undescribed when you click Export, Emberforge offers to describe them first. Descriptions are saved with the book and are not shown on the page.
Publishing on Kindle and other stores
- Kindle: upload the
.epubfile to Kindle Direct Publishing as your manuscript. KDP uses the cover you upload in its own form. Amazon’s free Kindle Previewer shows how the book will look on Kindle devices. - KPF is the private format of Amazon’s Kindle Create app and cannot be produced by other programs. You don’t need it: KDP accepts EPUB directly. If you want to use Kindle Create’s own themes, export to Word and import that file into Kindle Create.
- Apple Books, Kobo, Google Play, Barnes & Noble and aggregators accept EPUB.
E-book readers choose the font and text size, so the PDF typography settings do not apply. Notes and the print index are not included. EPUB export is part of the full version and the trial.
Publishing checklist
A short list of what to check before you upload your book to a print-on-demand service such as Kindle Direct Publishing (KDP) or IngramSpark, or to an e-book store. Requirements differ between services, so always check yours as well.
Print book
- Choose the trim size first, in the PDF settings, and use the same size when you set up the book at your print service.
- Use Preview to check the layout and the page count. Your cover designer (or the service’s cover tool) needs the final page count, because the spine width depends on it and on the paper you choose.
- Check the copyright page: the ISBN for this format, the edition and the year. Each format (paperback, hardcover, e-book) usually needs its own ISBN.
- Export the final PDF. Draft marking always starts switched off, so a final PDF is never watermarked by accident.
- Upload with “no bleed”. Emberforge pages keep everything inside the margins, so nothing runs off the page edge. Fonts are embedded and text is set in pure black, as print services expect.
- Order a proof copy and read it on paper. The Publisher Control Number on its copyright page tells you exactly which version you are holding.
E-book
- Add the e-book’s own ISBN in Book details if you have one (some stores, such as KDP, do not require one for e-books).
- Export the EPUB, and open it in an e-reader app, or in Amazon’s free Kindle Previewer for Kindle, to check the contents, pictures and chapter starts.
- Upload the EPUB as your manuscript, and the cover image separately in the store’s form.
- Answer the store’s questions honestly, for example KDP’s question about AI-generated content.
AI tools (optional)
Emberforge never requires AI: you can write and publish a whole book without it, and you can hide every AI tool in Settings → General. But if you want a second pair of eyes, AI can save time and catch things you might miss. Emberforge’s AI tools are built around one rule: the AI suggests, you decide. Nothing in your book changes unless you accept it.
Why you might want them
- A second pair of eyes before your editor. Catch typos, punctuation, grammar slips and awkward word choices chapter by chapter, so your editor (or your proof copy) can focus on the story.
- Unstick a clunky sentence. Get another way to say something, in the tone you want, and keep it only if it’s better.
- Keep your own voice. The AI Editor points out patterns that make prose sound machine-written, such as stock phrases, hedging and stacked metaphors, so your writing stays yours.
- Check before you submit. Some publishers, agents, contests and stores ask about AI-generated content (Kindle Direct Publishing, for example, asks when you publish). AI detection shows how detectors see your text, or text you received from a collaborator.
- An index in minutes. For nonfiction, the AI index saves the hours (or the fee) a back-of-book index usually takes.
The tools
| Tool | What it does |
|---|---|
| Rephrase | Select text and choose a tone (21 in all, from Match existing and Formal to Tense / suspenseful, Lyrical / poetic and Terse / punchy), then Rephrase. You see the suggestion and choose whether to use it. If the text changed while the AI was working, the suggestion is copied to the clipboard instead, so nothing is overwritten. |
| AI Editor | Reviews the chapter or a selection: an overall review like an experienced editor’s; spelling, punctuation, grammar and word use; and AI-sounding prose (“not X but Y”, lists of three, stock phrases, hedging, stacked metaphors). Findings are underlined in the text and listed in the left panel, where you apply, resolve, reopen or dismiss each one. A review keeps running while you work on other chapters, and it is kept with its chapter. |
| AI detection | Checks the selection or the whole chapter with Pangram, Originality.AI, GPTZero or Copyleaks. Passages a detector flags are highlighted on screen (never in your chapter file). The last result for each chapter is kept with its highlights, so they are still there the next time you open the chapter. Checking a selection updates only the highlights in that selection; the rest of the chapter keeps its own. Rewriting a highlighted passage removes its highlight, and Clear detections removes them all. Passages Pangram finds human-written are green, and a paler highlight means the detector is less sure. Without a Pangram API key, use Import Pangram report: copy the chapter’s text, check it on pangram.com, download the report as PDF and choose it. The report is used only if its text is exactly the chapter’s; if the chapter changed since, Emberforge shows where the two differ. |
| AI index | Builds a back-of-book index for the print PDF: choose the categories (people, places, organizations, subjects, works, events, technical terms) and cross-references. The AI proposes the entries; page numbers come from the real typeset pages and are recalculated on every export. You can review and remove entries. |
The AI tools sit on two bars under the formatting toolbar: the AI tools bar (the AI provider, Rephrase and the AI Editor) and the AI detection bar. The AI tools and AI detection buttons at the right end of the formatting toolbar fold each bar away and bring it back; Emberforge remembers your choice. To remove a tool altogether, use Settings → General.
Setting up
- Create an API key with an AI provider: Anthropic (Claude), OpenAI, Google (Gemini), xAI (Grok), OpenRouter or DeepSeek. For AI detection, use a key from Pangram, Originality.AI, GPTZero or Copyleaks.
- Paste it in Settings → AI providers (or AI detectors) and choose Test. Emberforge loads the provider’s models and picks its low-cost “lite” model; you can choose another. Some providers also show your remaining credit.
- Choose a default provider. You can switch provider and model for a session from the AI tools bar, and in the AI Editor and index dialogs.
Cost, privacy and control
- You pay the provider directly, for what you use, under your own account. There is no AI subscription from XN3 Technologies and no markup. A chapter review with a “lite” model usually costs very little, but prices are set by each provider.
- Your text goes only where you send it. Text is sent only when you use an AI tool, only the text that tool needs, directly from your computer to the provider you chose. XN3 Technologies never receives it. Check your provider’s terms for how it handles data sent through its API.
- Your keys are protected. API keys are stored encrypted for your Windows account and can be moved to another computer with a passphrase-protected backup (Settings → Security & keys).
- Nothing breaks if AI is unavailable. An invalid key, an empty account, a rate limit or being offline is reported plainly, and your work carries on.
AI tools are part of the full version and the trial.
Settings
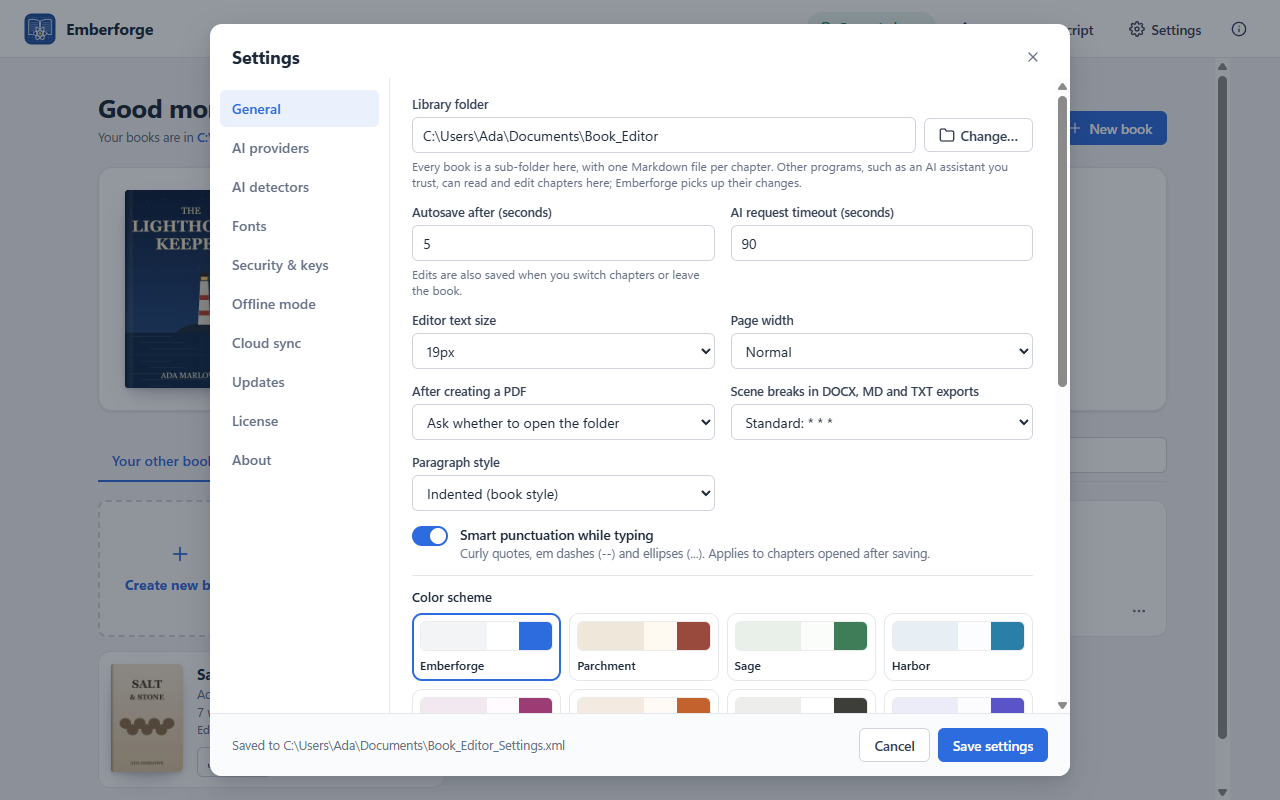
Open Settings with the Settings button at the top of the bookshelf (or click the Emberforge logo there for the About tab).
| Tab | What it holds |
|---|---|
| General | Color scheme (twelve presets, plus Custom from four colors of your own), editor text size and page width, paragraph indents in the editor, autosave delay, the bookshelf folder (Change… opens another bookshelf), the startup screen, what to do after creating a PDF, scene breaks in Word, Markdown and text exports, underlining misspelled words as you write, and hiding AI tools. |
| AI providers | API keys and models for Rephrase, the AI Editor and the AI index; the default provider; the request timeout. |
| AI detectors | API keys and the default detector for AI detection. |
| Fonts | Add .ttf or .otf files, or pick installed Windows fonts, for the PDF. Fonts are checked for embedding. |
| Security & keys | API keys are stored encrypted for your Windows account. Move them to another computer with a passphrase-protected backup. |
| Offline mode | Turn off AI features, cloud sync, or both, so your book content stays on your computer (see Offline mode). |
| Cloud sync | Optional encrypted sync of your books between computers through your own Google Drive (see Cloud sync). |
| Updates | How often to check, the update server, what to do if the European server can’t be reached, and Check for updates now. |
| About | Version, edition (trial days left, Basic or full version), activation key, this manual, release notes, privacy policy and contact details. |
This manual opens from Help → User’s manual (F1) and from Settings → About.
The trial, Basic mode and the full version
Free trial
Emberforge starts with a 15-day free trial of the full version, with every feature. A short reminder on the bookshelf shows the days left. Reinstalling or updating does not restart the trial.
Basic mode
After the trial, Emberforge keeps working in Basic mode, free of charge, for as long as you like. Your books and settings are always kept. Basic mode gives you a complete writing app: the editor with chapters and parts, import, Word, OpenDocument, Markdown and text exports, and a print-ready PDF in the three most popular trim sizes, for up to five books. The full version adds e-books, every print setting, AI tools, notes and more.
| Feature | BasicFree, after the trial | Full versionFree for 15 days in the trial |
|---|---|---|
| Books on the bookshelf | Up to 5 | Unlimited |
| Writing and editing: chapters, parts, front and back matter, find and replace, autosave | ||
| Offline spell check, with a dictionary for each book | ||
| Import from Word, OpenDocument, Markdown and text | ||
| Word, OpenDocument, Markdown and text export | ||
| Page sizes for Word and OpenDocument | US Letter | Letter, A4, Legal, A5, B5, book sizes |
| Print-ready PDF | Standard layout | Every setting |
| Trim sizes | 5 × 8, 5.5 × 8.5, 6 × 9 in | All, plus custom |
| 8.5 × 11 in with spiral or 3-ring binding | ||
| Custom margins, gutter, title pages, page numbers and running heads | ||
| Print-ready PDF/X-1a and PDF/X-3, archival PDF/A, and pictures in black and white for print | ||
| EPUB e-books for Kindle, Apple Books, Kobo and more | ||
| Bundled book fonts | ||
| Windows fonts and fonts you add | ||
| Diary dates as subheadings | ||
| Pictures in chapters | Existing pictures | Add, edit and caption |
| Sticky notes | ||
| AI tools: Rephrase, AI Editor, AI detection, AI index | ||
| Publisher Control Numbers and draft watermarks | ||
| Encrypted cloud sync between your computers (your own Google Drive) | ||
| “Created and Typeset with Emberforge” line | Always shown | Your choice |
| Automatic updates |
A bar at the top of the editing page shows when you are in Basic mode, and Settings → About lists what Basic includes and what the full version adds.
Buying the full version
- Buy a license on the Emberforge purchase page (or choose Buy the full version in the app).
- Your activation key is emailed to the address you used to pay, usually within a few minutes. If you renew before your license ends, the new year is added to the end of your current license.
- In Emberforge, open Settings → About, choose Enter activation key… and paste the key. No internet connection is needed to activate. A free key from a promotion can be used once per computer.
Settings → License shows your license and the activation keys you have entered. A reminder appears in the last 30 days.
The full version is an annual license for one person, on up to 5 computers, for example a desktop and a laptop kept in step with cloud sync. It does not renew automatically: if you don’t renew, Emberforge continues in Basic mode with all your books. If the full version isn’t right for you, email us within 14 days of your purchase for a full refund. The license terms have the details.
Updates
Emberforge checks for a new version when it starts (you can choose once a day, week or month, or never, in Settings → Updates). When one is available it shows the release notes and offers Update and restart or Another time. Updating saves your work, installs the new version and restarts; your books and settings are kept. After an update, a “What’s new” window lists the changes.
- Updates come from a server in Europe (Frankfurt) or the United States (Virginia). Users in the United States and its territories use the US server; everyone else uses Frankfurt. You can pick the server in the update prompt or in Settings.
- Check by hand with Help → Check for updates….
- Read the release notes any time in Help → Release notes….
Cloud sync (optional)
Cloud sync lets you write on more than one computer: start a chapter on your desktop and continue on your laptop. Your books are backed up to your own Google Drive and kept in step on every computer where you turn sync on. It is part of the full version (and the free trial), and it is off until you turn it on. Emberforge works fully without it.
End-to-end encrypted
- Every chapter, picture, note and book detail is encrypted on your computer (AES-256) with a key protected by your sync password, before anything is sent.
- File names in your Drive are random-looking codes, so they don’t reveal your titles.
- Emberforge asks Google only for its own private app folder in your Drive. It cannot see, open or change any of your other files, and the folder doesn’t clutter your Drive.
- Your sync password and recovery key never leave your computers. Nobody, including XN3 Technologies, can reset them for you.
- Never synced: your AI keys, your activation key and your settings.
Turn it on (first computer)
- Open Settings → Cloud sync and choose Set up cloud sync….
- Choose Connect Google Drive. Your web browser opens: sign in and allow Emberforge to use its own folder in your Google Drive, then return to Emberforge.
- Choose a sync password of at least 8 characters (a longer phrase is stronger; the meter shows how strong it is), and whether this computer should Remember it or Ask for it every time Emberforge starts.
- Save your recovery key: copy it into your password manager, save it as a file, or write it down, and keep it away from this computer. It is the only way to open your cloud library if you forget your sync password.
- Tick I have saved my recovery key and choose Start syncing. Your books are encrypted and uploaded.
Add another computer
- Install Emberforge on the other computer and open Settings → Cloud sync → Set up cloud sync….
- Sign in to the same Google account. Emberforge finds your cloud library.
- Enter your sync password, the same one you chose when you set up cloud sync on your first computer (or, if you forgot it, your recovery key), and choose Unlock and sync. Your books arrive; books already on that computer are kept and synced too.
A Google account holds one cloud library, for one bookshelf. If you keep more than one bookshelf, turn on cloud sync for only one of them per Google account, and use another Google account for another bookshelf. Emberforge won’t join a cloud library that another bookshelf on this computer already syncs with.
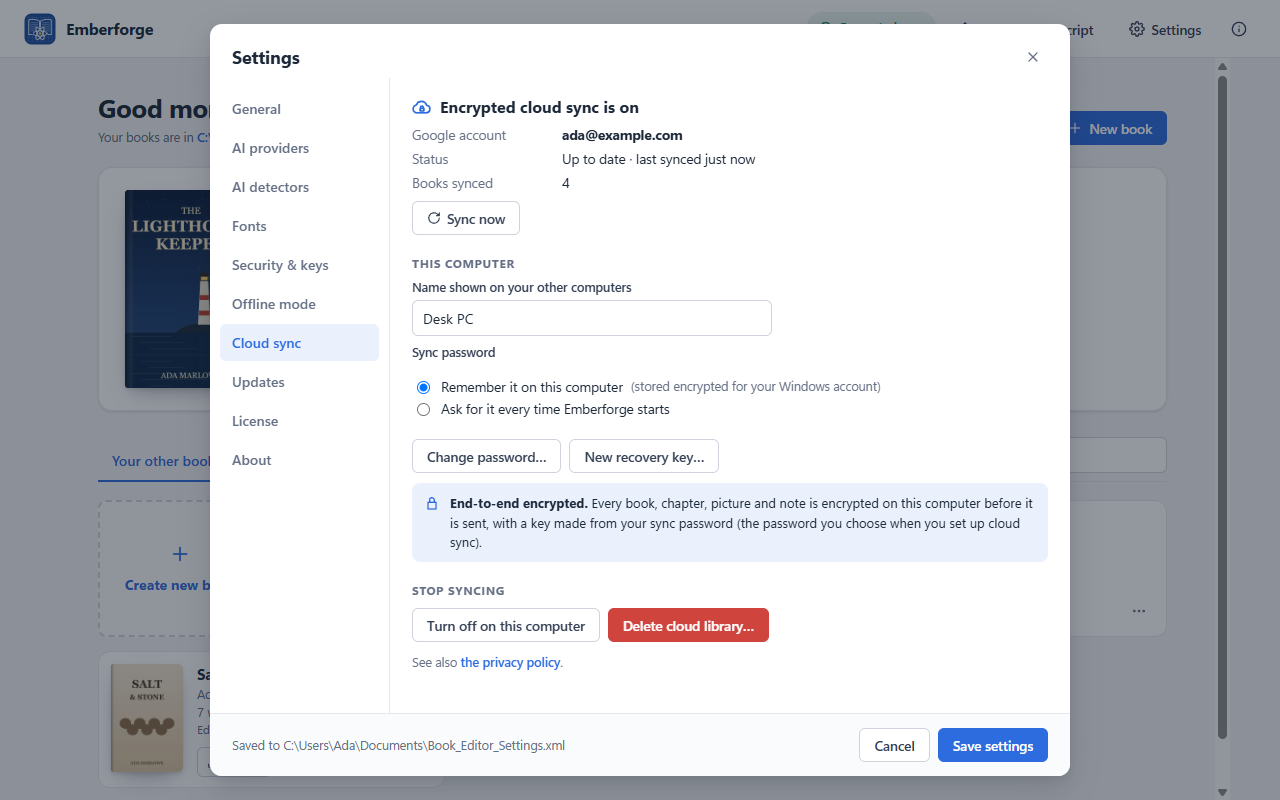
Give each computer a name you recognize, such as “Desk PC” or “Laptop”, under This computer. Emberforge uses it when it tells you where a change came from.
When it syncs
- About a minute after you stop typing: the chapters you changed are sent.
- Every few minutes while Emberforge is open.
- When you open a book (Emberforge gets the latest version first), and when you return to the bookshelf.
- When you close Emberforge (“Saving your books to Google Drive…”).
- Any time you choose Sync now in Settings → Cloud sync.
Moving a book to the Archive moves it on your other computers too. Deleting a book deletes it everywhere; on your other computers it goes to the Recycle Bin, so it can still be restored there.
The sync indicator
While sync is on, the bookshelf and the book bar show a small cloud with a lock. Click it for details.
| It says | Meaning |
|---|---|
| Encrypted sync | Your bookshelf is encrypted and up to date in your Google Drive. |
| Encrypted sync, with an amber dot | Changes on this computer are waiting to sync. They are sent about a minute after you stop typing, or when you leave the book. |
| Syncing… | Changes are being sent or received. |
| Sync offline | Google Drive can’t be reached. Keep writing: changes sync when you’re back online. |
| Sync locked | This computer asks for the password at every start. Click Unlock and enter it. |
| Sync: sign in | Google no longer accepts the sign-in (for example, you removed Emberforge’s access in your Google Account). Set up sync again in Settings. |
| Sync conflict | A chapter was changed on two computers. Click to choose which version to keep. |
When a chapter changed on two computers
If you edit the same chapter on two computers before they sync (for example, on a laptop with no internet), Emberforge shows both versions side by side, with when each was changed and its word count, and asks which to keep:
- Keep this computer’s version or Keep Laptop’s version;
- Keep both: the other version is added as a new chapter right after this one, named for example “Storm (from Laptop, Oct 12)”, so you can merge them by hand;
- Decide later: nothing changes until you choose.
Book details, chapter order, sticky notes and pictures are merged automatically: only chapter text ever needs your decision. If the chapters were reordered on one computer, that order is kept, with the chapters added, removed or renamed on the other; if both computers reordered them, the order changed last wins.
A book open on two computers
If you open a book that is also open on another computer, Emberforge tells you first (“This book is also open on Desk PC”), then opens it. Changes on both computers sync; if the same chapter is changed on both, you choose as above.
A secure backup
Your cloud library is also an encrypted backup of your books, with their pictures, notes and book details. If the books on a computer are lost, for example when a drive fails, a computer is replaced or the library folder is deleted, install Emberforge, turn on cloud sync with the same Google account and enter your sync password or your recovery key. Emberforge downloads and decrypts your books again. On a computer that is still syncing, a book missing from the library folder comes back by itself at the next sync.
Your password and recovery key
- Change password… changes it for every computer; nothing needs to be uploaded again. Computers that remember the password keep syncing; computers that ask every time need the new password.
- New recovery key… creates a new key and stops the old one from working.
- Forgot the password? Use Forgot the password? Use your recovery key when you unlock, then choose a new password.
Turning it off
- Turn off on this computer stops syncing there. Your books stay on the computer and in your cloud library, and your other computers keep syncing.
- Delete cloud library… deletes every encrypted Emberforge file from your Google Drive and turns sync off. The books on your computers are not deleted.
- You can also remove Emberforge’s access at any time in your Google Account (Security → Third-party apps).
Keep a separate backup as well. Changes and deletions you make in Emberforge are copied to your other computers and the cloud, so cloud sync can’t bring back a chapter or a book you deleted yourself. A copy of your library folder covers that (see Your files and backups).
If the full version lapses into Basic mode, syncing pauses. Your books stay on your computers and in your Google Drive, and syncing resumes when the full version is activated.
Offline mode
Offline mode makes sure your book content (chapters, notes, pictures and book details) stays on your computer. Choose it in Settings → Offline mode:
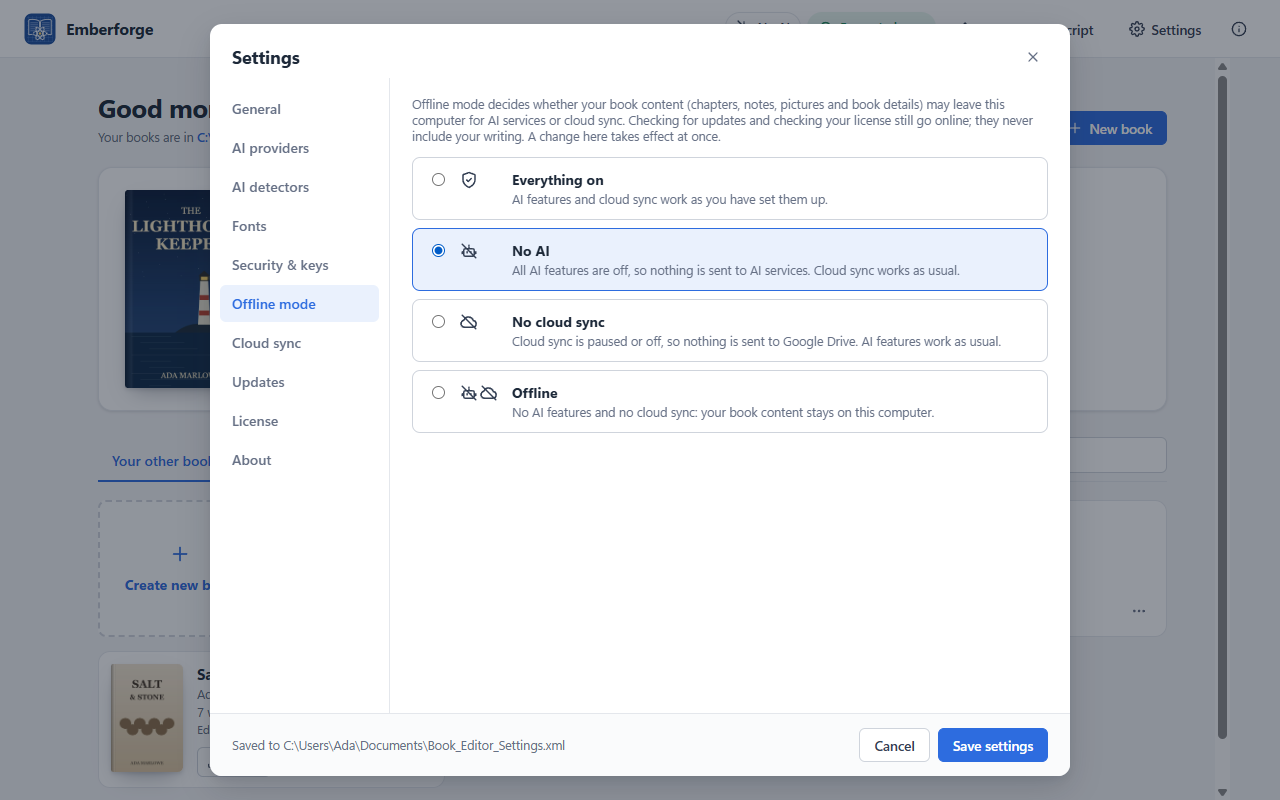
- Everything on: AI features and cloud sync work as you have set them up.
- No AI: Rephrase, the AI Editor, AI detection and AI index generation are hidden, and Emberforge refuses every request to an AI service. Your API keys are kept. Cloud sync works as usual.
- No cloud sync: nothing is sent to or received from Google Drive. AI features work as usual.
- Offline: no AI features and no cloud sync.
If cloud sync is set up when you choose No cloud sync or Offline, Emberforge asks whether to pause it or turn it off. Paused, your sign-in, sync password and cloud copy are kept; changes you make wait, and sync when you switch back to Everything on or No AI. Turned off, Emberforge signs out and forgets the sync password on this computer; to sync again, switch back and set up cloud sync.
While Offline mode is on, an indicator beside the cloud sync indicator shows a crossed-out robot (no AI), a crossed-out cloud (no cloud sync) or a pale paused cloud (sync paused). Click it to change the mode. AI Editor reviews and AI detection highlights you already have are hidden, not deleted, and come back when AI is allowed again.
Offline mode covers your book content. Checking for updates and checking your license still go online; they never include your writing. Basic mode has no AI features or cloud sync, so there your book content always stays on your computer.
Your files and backups
| What | Where |
|---|---|
| Your bookshelf (library) | Documents\Book_Editor (or another folder: Change… on the bookshelf or in Settings → General) |
| One book | Book_Editor\<Book Title> |
| Chapter text (one Markdown file per chapter) | <Book>\chapters |
| Pictures | <Book>\images |
| Book details, chapter order and PDF settings | <Book>\book.json |
| Copies made before a book-wide change | <Book>\.backups |
Earlier texts of chapters changed outside Emberforge, or not saved because of such a change (the last 20 replaced texts per chapter; your own unsaved texts for 30 days), and chapter files as they were before Emberforge converted them to UTF-8 or saved over formatting it can’t keep (names with --original; never removed by age) | <Book>\.versions |
| Rules for AI agents that work on your books | Book_Editor\AGENTS.md and CLAUDE.md |
| Archived books | Book_Editor\_Archive |
| The bookshelf’s settings | Book_Editor.config\settings.xml, the folder next to the bookshelf (for a bookshelf at the root of a drive, the _Emberforge.config folder inside it) |
| Added fonts | Book_Editor.config\fonts |
| This computer’s settings (license, window, update checks, startup screen, Offline mode, which bookshelf is open and the ones you opened before) | %APPDATA%\Emberforge\computer.json |
More than one bookshelf
A bookshelf is a folder of books. You can keep several, for example one per pen name or one on an external drive, and switch with Change… next to the bookshelf’s folder at the top of the bookshelf, or in Settings → General. The menu lists the bookshelves you opened before; Choose a folder… opens another one.
Each bookshelf has its own settings, kept next to it in a folder named after it with .config at the end (for Book_Editor: Book_Editor.config; for a bookshelf at the root of a drive, such as E:\, the _Emberforge.config folder inside it): AI keys, appearance, editor and export options, cloud sync and added fonts. Before switching, Emberforge says which applies: a bookshelf with settings of its own opens with them; a folder without any opens with the default settings, as after a new installation. Your license and this computer’s settings (the window, update checks, the startup screen and Offline mode) stay as they are. Emberforge then opens that bookshelf every time, until you change it again.
AI keys are encrypted for your Windows account on the computer where you entered them. A bookshelf whose settings were saved on another computer or Windows account (for example one on an external drive) opens with its other settings, but its AI keys can’t be used here: enter them again in Settings → AI providers and AI detectors, or import a key backup in Settings → Security & keys. Emberforge doesn’t erase the other computer’s keys from the bookshelf’s settings.
Cloud sync is set up for each bookshelf, and a Google account holds one cloud library: sync only one bookshelf per Google account, and use another Google account for another bookshelf (see Cloud sync).
Versions before 1.8.5 kept the settings in Documents\Book_Editor_Settings.xml and added fonts in Documents\Book_Editor_Fonts; the first start of 1.8.5 moves them next to your bookshelf. If that file can’t be read, it stays in your Documents folder and Emberforge tells you.
Moving to another computer
- Install Emberforge on the new computer.
- Close Emberforge if it is running: the installer starts it when it finishes, unless you clear Run Emberforge on its last page. Otherwise Emberforge may save its own settings over the ones you copy.
- Copy your
Book_Editorfolder and theBook_Editor.configfolder next to it (its settings and added fonts) into its Documents folder. If you put them somewhere else, open that bookshelf with Change… on the bookshelf. - If you use AI tools, move your API keys with Settings → Security & keys: keys are encrypted for your Windows account, so the keys in the copied settings can’t be used on the new computer. Make a passphrase-protected backup on the old computer and import it on the new one, or enter the keys again.
- Enter your activation key in Settings → About.
With the full version, cloud sync can bring your books (and added fonts) across for you instead: turn it on on both computers, with the same Google account.
Uninstalling
Uninstall Emberforge from Windows Settings → Apps. Your books, the settings and fonts next to them, and this computer’s settings in %APPDATA%\Emberforge are left in place, so nothing is lost if you install it again later. To remove everything, delete your bookshelf folder, the .config folder next to it and %APPDATA%\Emberforge.
Back up your library folder regularly, for example with OneDrive, File History or an external drive. Because each book is a normal folder of text files, any backup tool works.
Privacy and the GDPR
Privacy is part of how Emberforge is designed, not an add-on. XN3 Technologies is committed to protecting your personal data and to complying with the European Union and United Kingdom General Data Protection Regulation (GDPR) and the California Consumer Privacy Act (CCPA).
What this means in practice
- Your work stays with you. Your books, notes, settings and API keys are stored on your computer. XN3 Technologies never receives them, and there is no account with us. Nothing goes to the cloud unless you turn on cloud sync, which encrypts your books on your computer before they go to your own Google Drive.
- No tracking. There is no analytics, telemetry, advertising or tracking in the app, and no cookies, analytics or advertising on our website.
- Only what is needed. An update check, and the full version’s daily license check, send only what any web request sends: your IP address, the time, the file requested and the app’s technical details. Our update servers keep no request logs, and you can switch update checks off. Basic mode and the trial never make a license check.
- Your data stays in Europe if you are outside the United States. Users outside the US are served from our server in Frankfurt, Germany, and you can choose the server for each update.
- AI only when you choose it. AI features send text only when you use them, only to the provider you choose, under your own account with that provider. We never see that text.
- Activation works offline. Entering an activation key needs no internet connection, and the key is kept only on your computer.
- Purchases. Payments are handled by our payment provider; we never see your card details. We use your name and email address only to send and support your activation key.
- Secure by default. Updates and AI requests use encrypted connections, downloaded updates are verified before they are installed, and API keys are stored encrypted for your Windows account.
Your rights
Under the GDPR you can ask us to give you access to your personal data, correct it, delete it, restrict its use or give it to you in a portable form, and you can object to its processing and complain to your data protection authority. California residents have the rights the CCPA gives them. We do not sell or share personal information, and we do not use it for advertising or profiling.
Because your books and settings never leave your computer, most of your data is already in your own hands: you can view, copy, export or delete it at any time. To exercise a right or ask a question, email info@xn3tech.com.
This is a summary. The full privacy policy, also in the app at Help → Privacy policy…, is the authoritative text.
Keyboard shortcuts
| Shortcut | Action |
|---|---|
| Ctrl+B | Bold |
| Ctrl+I | Italic |
| Ctrl+Shift+S | Strikethrough |
| Ctrl+Z / Ctrl+Y | Undo / redo |
| Ctrl+Enter | Insert a page break |
| Ctrl+F | Find |
| Ctrl+H | Find and replace |
| Enter / Shift+Enter | Next / previous match (in Find) |
| Ctrl+S | Save now |
| Ctrl+Alt+M | Add a note to the selected text |
| F7 | Check spelling (the Spelling panel) |
| F1 | Open this manual |
Glossary
| Term | Meaning |
|---|---|
| Back matter | Pages after the story or main text: acknowledgments, afterword, about the author, notes. |
| Bleed | Printing that runs off the edge of the page. Emberforge pages have no bleed: everything stays inside the margins. |
| EPUB | The standard file format for reflowable e-books, accepted by Kindle (KDP), Apple Books, Kobo, Google Play and most other stores. |
| Front matter | Pages before the main text: title page, copyright page, dedication, epigraph, contents, foreword, preface. |
| Gutter | Extra space added to the inside margin at the spine, so text doesn’t disappear into the binding. |
| ISBN | International Standard Book Number: the identifier booksellers use. Each format of a book usually has its own. |
| KDP | Kindle Direct Publishing, Amazon’s service for publishing Kindle e-books and print-on-demand paperbacks and hardcovers. |
| LCCN | Library of Congress Control Number, a number US publishers can request for library cataloging. |
| Publisher Control Number (PCN) | Your own identifier for each version of a book that leaves Emberforge (see Publisher Control Number). |
| Print on demand (POD) | Printing each copy when it is ordered, as KDP, IngramSpark and similar services do. They need a print-ready PDF interior and a cover file. |
| Recovery key | A 32-character code you save when you set up cloud sync. It opens your cloud library if you forget your sync password. |
| Recto / verso | The right-hand (odd-numbered) page / the left-hand (even-numbered) page of a spread. |
| Reflowable | Text that rewraps to fit the reader’s screen and chosen text size, as in an EPUB. |
| Running head | The line at the top (or bottom) of a page with the book title, author, chapter or current date. |
| Scene break | A marked pause within a chapter, printed as * * *, ⁂, • • • or a blank line. |
| Sync password | The password that protects your books in cloud sync. It is never sent anywhere, so keep it safe and save your recovery key. |
| Text block | The area of a page inside the margins, where the text goes. |
| Trim size | The finished size of a printed page, such as 5.5 × 8.5 in or 6 × 9 in. |
Troubleshooting and help
“Could not write the file”
The file you are exporting to is probably open in another program, such as Word or a PDF viewer. Close it and export again.
A picture is missing from an export
The picture file is no longer in the book’s images folder. The export names the missing file; add the picture again in the chapter.
“This book uses a fixed Publisher Control Number, but none has been entered”
Enter the number in Book details → Copyright page, or switch the number off.
New, Import, Clone or Restore is refused
Basic mode keeps up to 5 books on the bookshelf. Move a book to the Archive to make room, or buy the full version for unlimited books.
The PDF looks different from the editor
That is expected. The editor is for writing, in your chosen text size and page width; the PDF is typeset with the PDF settings (font, size, margins, hyphenation and justification). Use Preview in the PDF settings to see the printed result.
A chapter shows text I didn’t write
Another program changed the chapter file. If you also had unsaved edits, Emberforge asks which version to keep. The Reload from disk command re-reads the whole book.
Cloud sync says “Sync locked” or asks me to sign in
“Sync locked”: this computer asks for the sync password at every start; click Unlock. “Sign in”: Google no longer accepts Emberforge’s sign-in, for example after you removed its access in your Google Account; open Settings → Cloud sync and set it up again with the same Google account and sync password.
Updates don’t arrive
Make sure the computer is online, then choose Help → Check for updates…. If the European server can’t be reached, Emberforge asks before using the US server (see Settings → Updates).
Contact
Questions, ideas and problem reports are welcome at info@xn3tech.com. Please include your Emberforge version (Settings → About).
This manual describes Emberforge 1.8.14. Emberforge is a product of XN3 Technologies.